MCM Coat Rack

One of the things I really wanted was an Eames Hang-It-All. I think the Hang-It-All is just a wonderful piece, plus it will provide a place to hang my hoodie and purse out of the way.

But have you seen the price of those things? It is SO not something I can afford. And I love just about everything he has ever designed. So, I started looking on Pinterest for ways to make my own Eames Hang-It-All. I found a few posts that gave me the basics of what I needed to do. All of them used some form of existing coat rack and painted wooden balls. I decided that, since I live in an apartment, I’d use one of the over-the-door coat racks.

I started pricing things out to see where I could get the materials the cheapest. I was down to a combination of Amazon, Michael’s, and the Dollar Store. I was just getting ready to purchase my Amazon supplies when I found a coat rack on Amazon that looks almost exactly like Eames’ and it was less than $30. The total for all the supplies I would need to make my DIY version was way over $30 (much closer to $60-75) and, after spending the time to put it together, it just wouldn’t look enough like an Eames Hang-It-All.

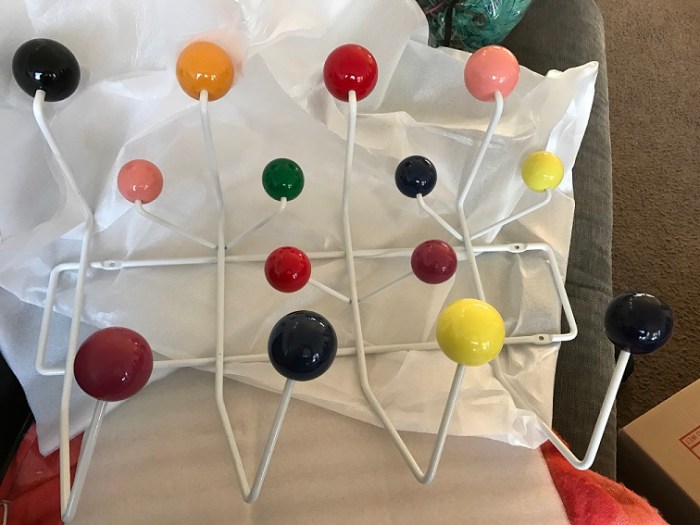
So, I bought the knock-off and I don’t feel bad about it. There are times when, even though I love making thinks myself, it is just better and easier to buy what you want. I placed my order and, thanks to my Prime membership, it arrived two days later. I was worried it would look cheap and be made of inferior parts (I was ready to send it back if need be) but it looks wonderful. What do you think?

img_6871

It would still be nice if I was able to hang this over the door. Hmmm. I may have to think about that a little bit longer before I drill holes in the wall. I’ll let you know what I finally decide.

Update

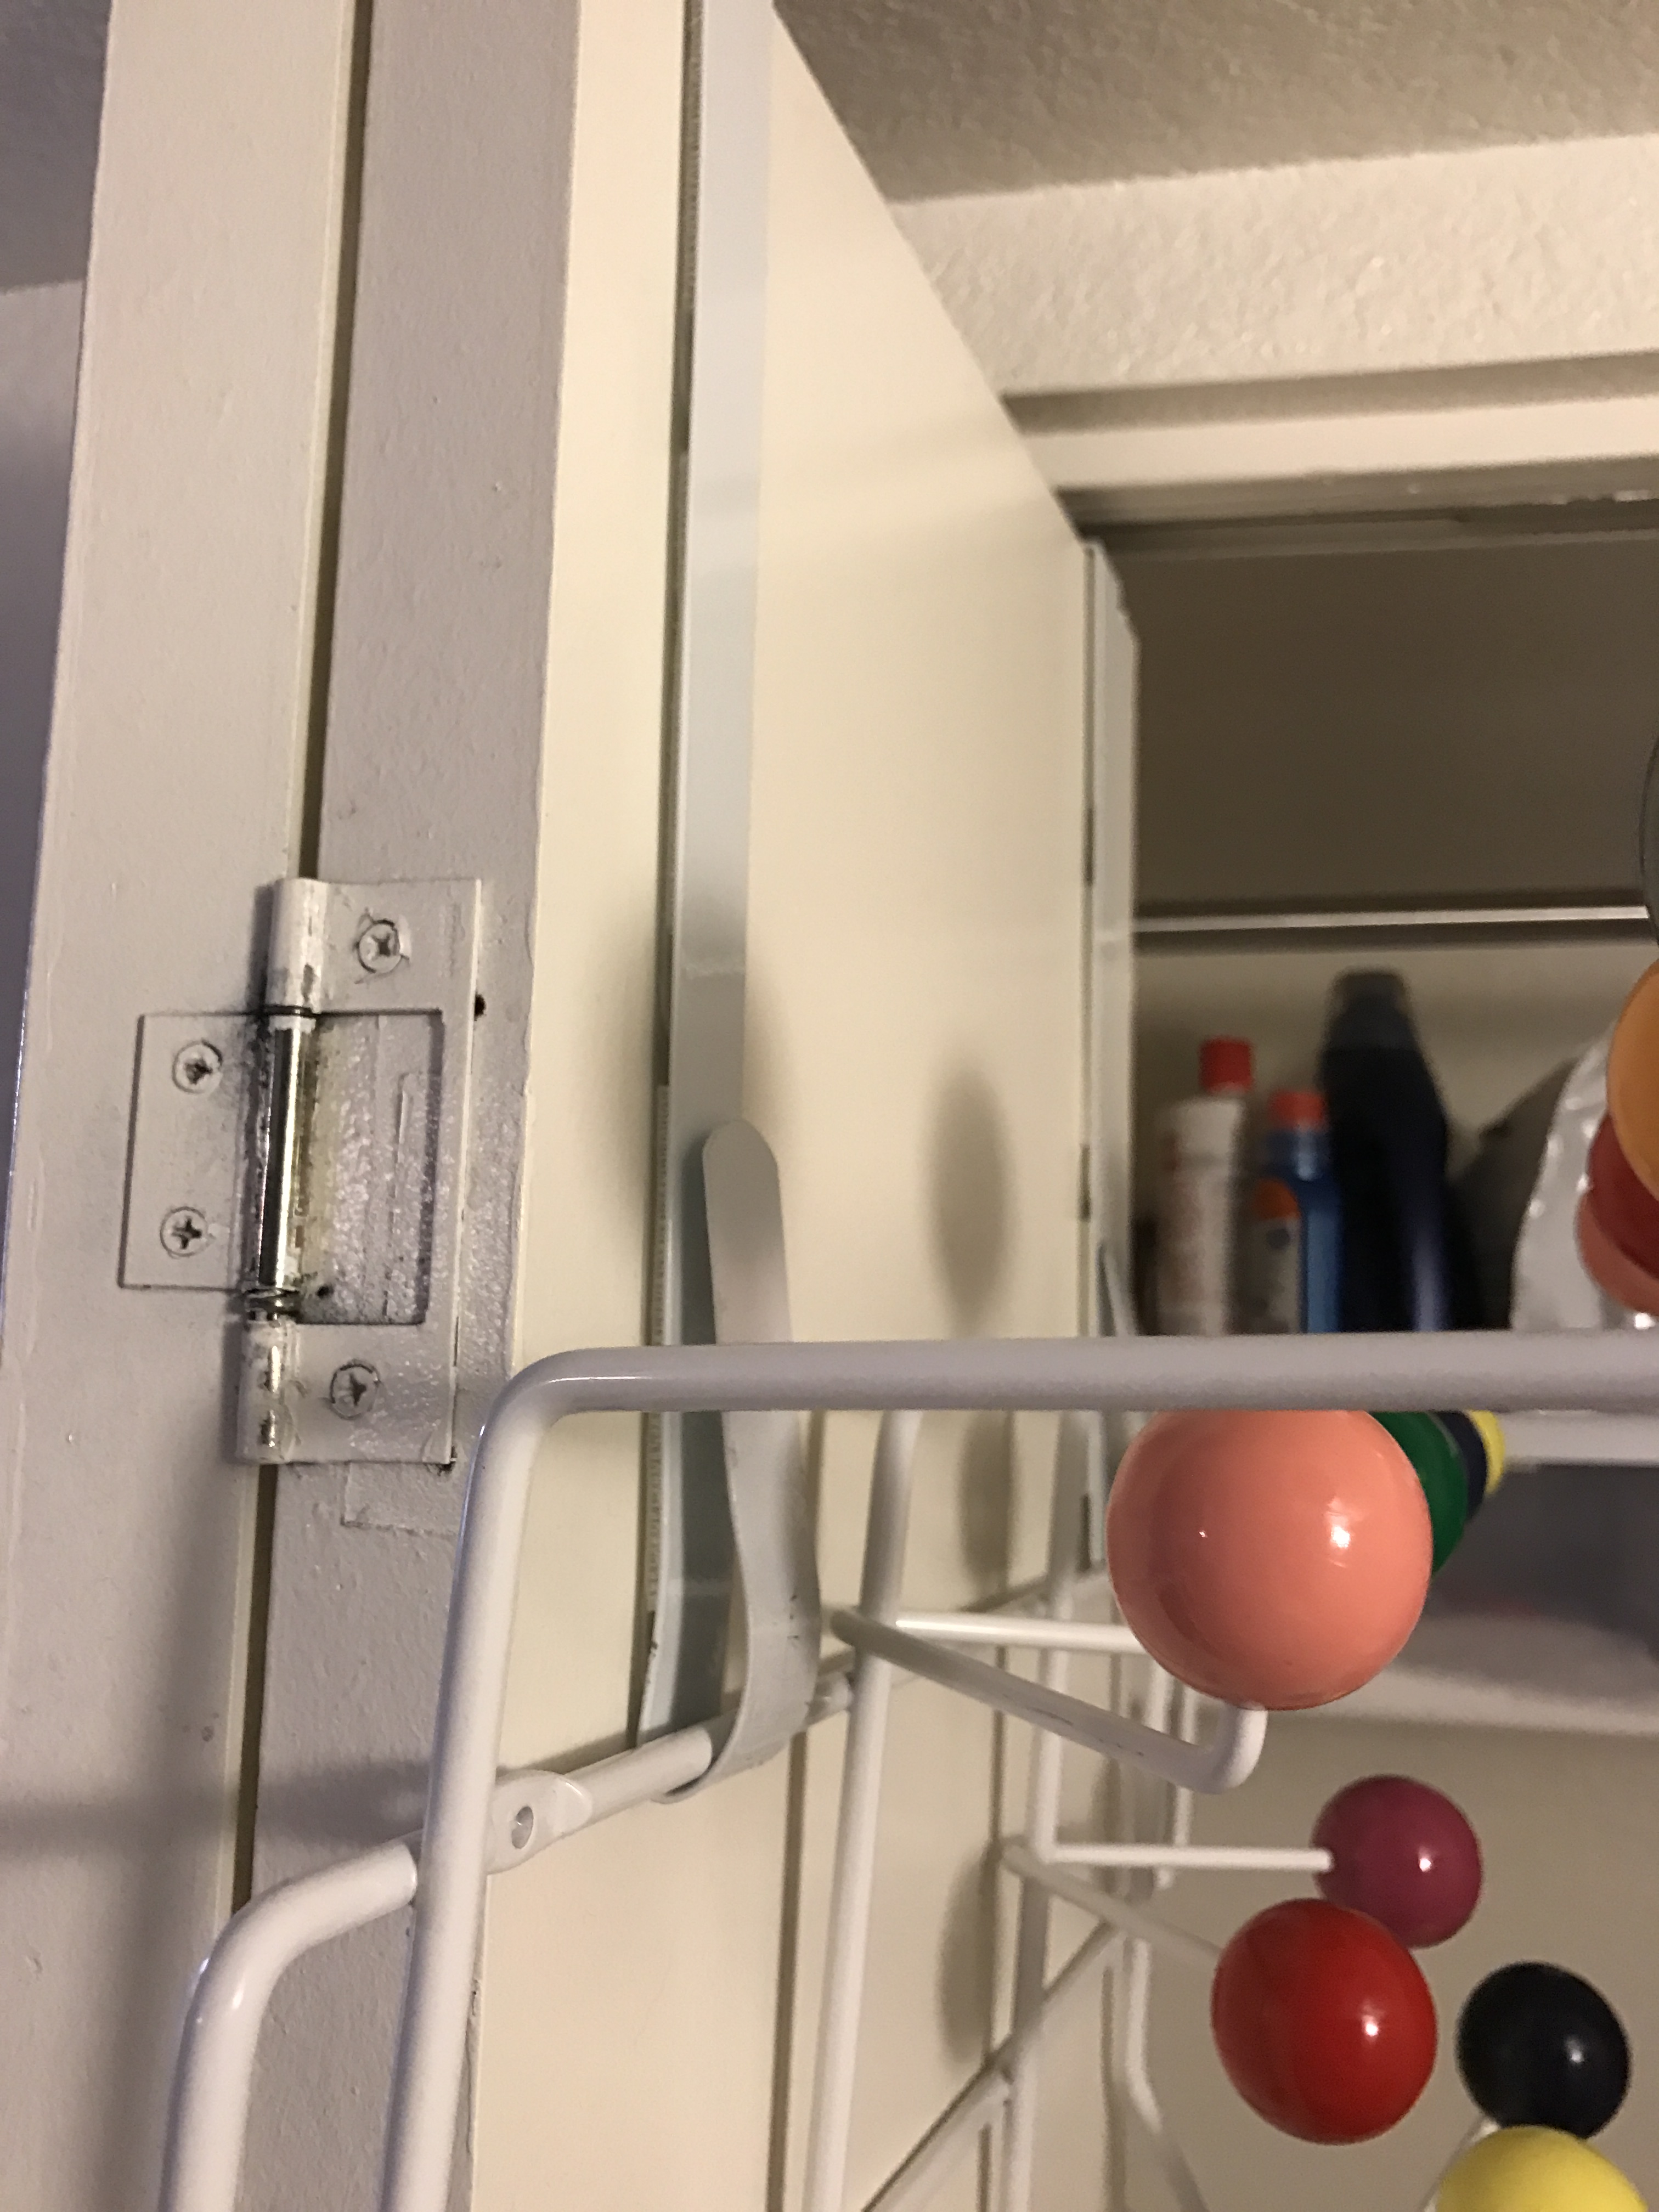
The first thing I tried was a hanger made for an ironing board. Unfortunately, it left the coat rack too high to be of much use. Next I purchased two 12-inch wreath hangers. These put the coat rack at the right height (for me) but left it hanging too far from the door due to the width of the hook at the bottom. After all, it was meant to hang a wreath. So, I slowly bent the hooks so they would only be wide enough for the crossbar of the coat rack. I was worried that I would have to heat up the metal but it was soft enough that I  just do with with pliers and my fingers.

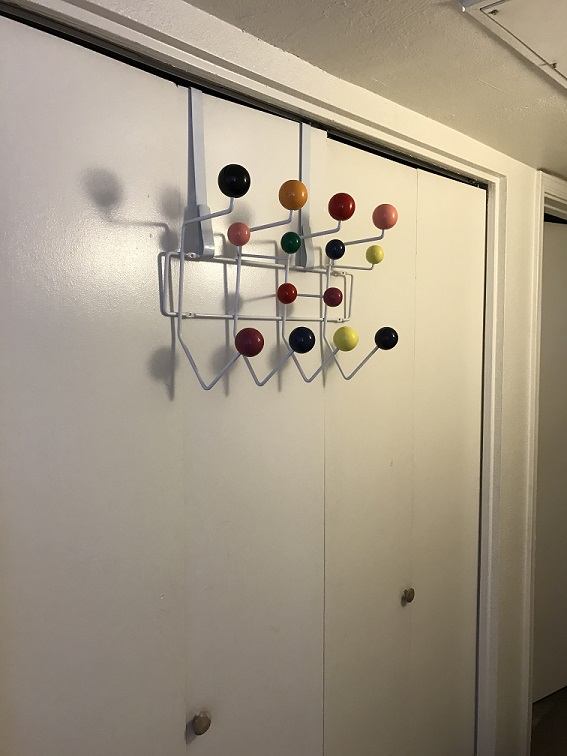
I also decided to hang it on the folding doors in the hallway instead of on the outside of the door to my office (spare bedroom). That way, when the door was open during work hours, it wouldn’t be in my office. The folding doors hide the washer/dryer and, therefore, are only open when I have to do laundry.

IMG_7615

So now I needed to think of a way to keep the hangers attached to the door. The first thing I tried were some Velcro dots I had. They would hold for a few minutes but then would pull away. It was driving me crazy! And I couldn’t use it, which was making me even crazier. (And people who know me well will tell you it is a very short trip.)

I kept looking for something that would hold the coat rack to the wall and carry the weight of my jackets and purse. I finally found these large Command Picture & Frame Hanging Strips on Amazon. These are really heavy duty so each one can support 16 pounds.

I put three strips on each of the hangers. That basically covered the entire length of the hanger.

IMG_7842

I then determined where the hangers needed to be on the door to best support the coat rack, and marked the outside edges.

IMG_7838

I carefully placed each hanger on the door using as much pressure as possible to get a good seal. I then hung the coat rack from the hangers.

IMG_7845.JPG

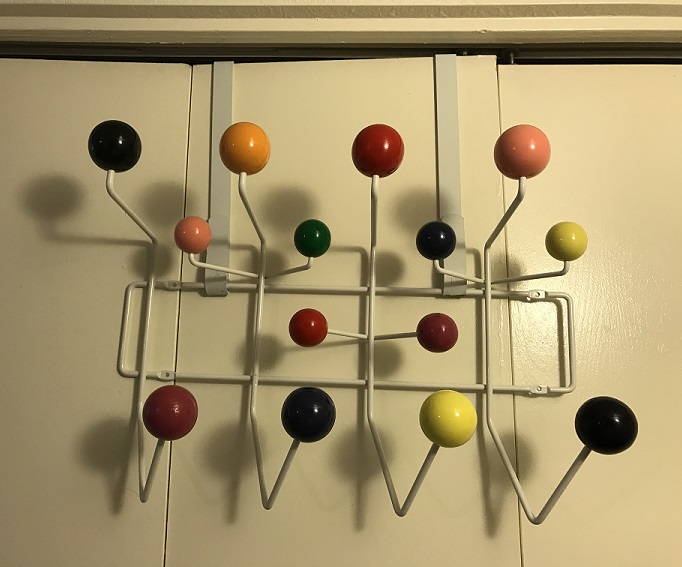
And once I close the doors it looks really nice. I think this is the perfect solution for hanging my coat rack in my apartment.

IMG_7847

Unfortunately, as soon as I hung something on it, the hangers pulled away from the door. I was so disappointed because I only put a scarf and a hat on the rack, nothing heavy. I think this happened because the part over the door was wider than the door. I was thinking that I could add something thick (like layers of cardboard) between the door and the hanger but there really isn’t any easy way for me to get behind the doors since my washer and dryer are in there. I could sit on the washer and close the door but then it would be pitch black.

IMG_8692

So, I went back to Amazon to see if I could find anything I could use. I really just did not want to put holes in the walls of the apartment. And I found some 3M Command Jumbo Utility hooks. They are supposed to be able to hold up step ladders so they should be able to hold up a scarf and hat, shouldn’t they?

I purchased four of the hooks thinking I’d use two on the top crossbar and two on the bottom crossbar. They weren’t as inexpensive as the other 3M hooks I’ve purchased but if they work, they’ll be worth every penny. The pricing was really weird. I could by individual ones for less than $4 but a package of two was almost $10. To say the least, I bought four individuals ones.

IMG_8690

I had to do a little of measuring to make sure I put them on the door at the same level since I didn’t have to worry about that when I used the wreath hangers. I measured where the bottom of the previous 3M hanger was, used my tape measure to make sure that both marks were at the same level…and you can see how well that worked out.

Collage 1.png

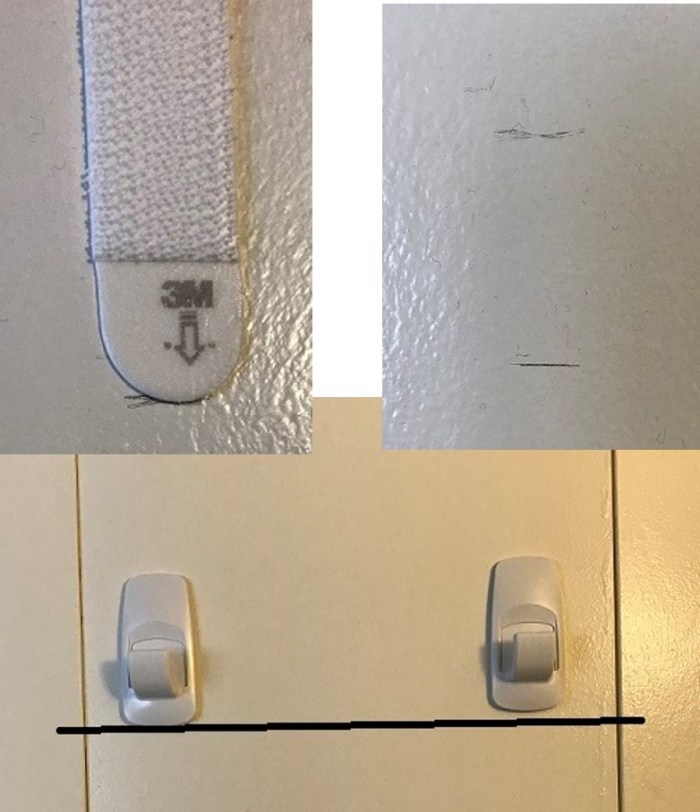
Well crap! So I took the one side off, being ever so thankful for the ease of removing Command hooks. I remeasured and rehung the one hook. I waited for almost two hours after that to give the adhesive time to really settle into place before I put the coat rack on.

IMG_8699

You almost can’t see the hooks from the front due to the smaller layer of hooks on the coat rack. The hooks are a little more prominent from the side but still don’t look bad.

I then put the same hat and scarf on the coat rack to see if it would hold. I think this solution is going to work!!

IMG_8700

Four hours later and everything is still looking great! Woo Hoo!!!!


Stone Trivets

I was bored. I hate it when I’m bored because I usually do stupid things like eat too much. And since I’m trying to lose some weight, I like to make sure I’m not bored.

So, I started looking for something interesting to do that wouldn’t cost me too much, as it was in between paydays. I had no idea what I wanted to do or what I had the materials to do. I don’t have a lot of supplies here in Arizona yet but I look through those that I had. It was sparse.

So then I started looking around on Pinterest. I kept seeing these trivets made with small rocks or stones. The posts I saw had the small rocks hot glued to felt. I liked the idea of the stone trivets but really thought the felt would just be too floppy.

I had purchased a set of four cork tiles a while back. I had thoughts of making my own corkboard but just never got around to it. And now I’ve found one I really liked on Amazon, and purchased it. I decided the cork would be a good base for the trivets. I also knew that a great place to get the stones I needed was at the Dollar Store.

I made a quick trip to the Dollar Store on Saturday and picked up a couple of bags (along with a few other things I couldn’t seem to live without). Does anyone else have that problem? You go in to the store for something specific and come out with a couple of bags of stuff. And half the time, I forget the item I actually went in for.

So today, I gathered up my supplies and started to work. I thought about using one of my luncheon plates or soup bowls as the pattern for the trivets. However, the soup bowls were too small and the luncheon plates weren’t round. Exactly how did I not remember my plates are square? But I did find the top to the canister I keep my tea in and figured it was just the perfect size. This is actually supposed to be the flour canister but I drink a LOT of tea. My flour I keep in plastic bags so I can store more in a smaller space, while not having to worry about bugs getting in it.

I traced around the outside of the lid to form the circle.

IMG_7603

After cutting it out, I placed the rocks around trying to get the most coverage and an fairly even top.

IMG_7606

After cutting it out, I placed the rocks around trying to get the most coverage and a fairly even top.

Then I started gluing them down. And let me tell you, it is not as easy as you would think it should  be to try to glue them down in the same place where I’d placed them while the designing it. The rocks kept scooting around and slipping. In the end, I just did the best I could at putting them back where I thought they went.

IMG_7610

And here is what it looked like at the end. Now, I’m really glad I used cork for the base, because even though you can see it, it looks like it goes with the rocks.

IMG_7612

For a first try, this isn’t bad. But there seems to be too much space between the stones. I wish I had some very, very small rocks to put in-between the bigger ones, or sand, or just something.

IMG_7613

IMG_7614

I had enough cork left over for another round trivet, so I went ahead and cut it out. However, I really wanted to use one of my plates as the pattern since I liked the shape – obviously since they are my plates. But once I cut it out, it really didn’t end up looking all that different from the round ones.

I ended up giving one of the round trivets to my neighbor. She loved it. I gave the other round one to my daughter. She wasn’t all that impressed. In fact, her comment to me was “Getting crafty there, Mom?” She is really not into home made things unless it is her organic face wash, body wash, and other beauty products. Her partner and his son both loved them. Marcus wanted it for himself. Bronwyn said he carried it around all night.

Personalizing My Picture Frames

The walls in my apartment are really bare. I mean I have a clock with a couple of elephant heads and a mirror. All on institutional off-white walls. Zzzzzzzzzzzzzzzzzzzzzzzzzzzzz

I’ve bought a few things to put on the walls but just haven’t gotten around to them up. I think I got caught in trying to make sure everything was going to be perfect before moving forward. And ended up never moving at all. Plus, I’m a procrastinator. I mean, I could win a gold medal in procrastination. One of my favorite movie lines is from Gone with the Wind, Scarlett O’Hara saying, “I’ll think about it tomorrow.” I can definitely get onboard with that. I’ve tried to find a way to stop procrastinating but I keep putting that off. I see a trend here….sigh

Well, something happened that, at least with this project, has made me decide to get my tush moving and get things up on the walls. My mom came for a visit around Thanksgiving and brought two very cool things for me. The first is my original birth certificate. I mean this is the one signed by the hospital when I was born too many moons ago. The other is a picture of me from the front page of the Columbus Dispatch, also many moons ago. Being on the front page of our largest newspaper (we actually had two at that time) was my 15-minutes of fame.

The first thing I started looking for was some picture frames I really liked. That is so much harder than you would think it would be. I mean, there always seems to be so many options. Who knew it would be so hard to find picture frames but nothing was what I liked or was willing to settle for. First, since I’m going mid-century modern, I needed something with clean lines. When I could find something with clean lines, it didn’t come in a color I liked. I mean, I dislike black a lot, which is the predominant color. I don’t like silver or platinum either. I am much more of an earth tone type of girl. I love browns, ivory, gold, bronze, orange, all those earthy tones. I needed something with more color and substance. I kept looking and looking and looking. I couldn’t find anything I really liked. I was really afraid my procrastination habit would kick in and I’d remember to start looking for pictures frames again sometime next year. I kept my motivation going to find the perfect picture frames. I considered this a major accomplishment.

I kept returning to this one set of seven frames I found on Amazon. They had the clean lines I was looking for, a variety of sizes for different uses, and, most importantly, a price tag I could afford. The only problem was they only came in silver. Why couldn’t they come in wood, matte gold, bronze? Anything but silver!! What is the solution? Rust-oleum, of course. I purchased a can of Hammered Copper Rust-oleum so I could make my picture frames a color I liked instead of settling for a color I don’t like. And they will go with the raised copper pipe plant stand, copper legged plant stand, and the copper pipe and leather wine rack that are on my To Do list.

With living in an apartment, spray painting the frames has to be done one at a time. I kept the box I used when I updated my cart. I had stored it in my outdoor storage closet because I just knew it would come in handy later. This can make the project drag out but it keeps management from yelling at me for tie-dying the porch.

I got notification from Amazon that my frames had been delivered but the paint wasn’t coming until the next day. I live at the back of my apartment complex, while the office and the mailboxes are at the front. It is part of my routine to take my dog for a walk up to the office to pick up the mail. This way we both get out in the fresh air and get some exercise. When I know I have packages, I carry a reusable bag I got from JoAnn Fabrics. After getting the mail from the mailbox, I went to the office to get my package. I walked in and immediately saw my box…and immediately knew there was no way that box was going to fit in the bag. The office manager suggested I open the box there and hopefully whatever was inside was small enough to fit in my bag. Sure enough, the Amazon box was much bigger than the box inside.

After unpacking the frames, I decided that the 17” frame would be the first one I would paint. That would be the one for my birth certificate. I ripped off the plastic, turned it over, and saw all the pieces I needed to remove to get the glass out. The corner pieces weren’t difficult to remove but the other ones…now those were a pain. A couple of them came out fairly easily, but the rest were a chore.

I eventually got them all out and removed the cardboard, the really bad picture, and the matting. However, I found that the glass was glued in using rubber cement. I couldn’t get it out. That put an end to the idea to take it out before spray painting it. So, now I needed to come up with a backup plan. Simple, cover the glass with paper.

IMG_6119

I then got out my box and risers from my previous spray painting projects. I only had 4 risers left so I could only spray paint one frame at a time. I am concerned about this because, with the delays, it is very possible my procrastination gene could kick in and I’ll finish painting these next year (if ever). It took a couple of coats but it ended up looking exactly like what I was looking for.

IMG_6111

IMG_6113

I love the way my birth certificate looks in the frame. However, as I was admiring my handy work, I noticed a little bit of paint on the glass. I wasn’t sure how I was going to get if off. Then I thought about the disposable razors I had. I got one and hit it with a hammer. The razor was very tiny but I could hold it without cutting myself, and it was bendable too. And it worked. I was able to scrap all the paint off. However, when I was putting everything back together, I noticed there seemed to be a fine film of paint on the inside of the glass. Well crap! I couldn’t take off that with my little razor blade. I went and got my nail polish remover. I ran a cotton ball of remover all over the inside of the glass and the film was gone. Then I spent even more time cleaning the glass to remove any trace of the acetone.

IMG_6121

IMG_6120

And there it is!

IMG_6118

The next frame I painted was the one I planned on putting the newspaper picture in. Luckily the smaller frames didn’t have as many things on the back as the big one did. They only had braces on the corners. So much easier to get them out. And the glass came out of frame. But for some reason, it didn’t dawn on me that I could leave the glass out when I painted them. I just covered the glass with paper and painters tape, put it back in, and then put the ‘fake’ picture back in to protect the back of the glass. I really think I just made my life harder than it needed to be.

IMG_6122

Going in, I knew I wouldn’t be able to use the matting so I needed to find something to go behind the picture to frame it out. I remember I had a bunch of scrapbooking paper and really hoped I could find something that looked mid-century modern in the packet. I came up with a few alternatives. The first options had orange in them and seemed to have that mid-century vibe. The second option were my teal options. I laid the picture on each of the options to help make my decision.

I ended up with the second of the orange options.

IMG_6176

I’m still working on the other frames. I’m not sure where I’ll put them all but I have found a location for my birth certificate and my newspaper clippings.

IMG_7304


Mid-Century Modern Redesign

Mid-century modern (MCM) is my favorite style of décor. That era is known for the clean lines of the furniture, the colors, the atomic bursts. I love the

I am slowly replacing all my furniture and decor with mid-century modern MCM or MCM inspired pieces. The very first thing I purchased was a dresser and mirror to use as my TV stand. I love the look of the dresser and it works great as my TV stand. Well, it worked better before I bought my new 43” TV. Now there isn’t much space left over on the sides to hold he DVR and internet router. I’m already working on the plans for my new entertainment center, which I’m going to build myself.

img_6876

And I hung the mirror on the wall. It looks pretty good too. My wall doesn’t look quite so bare now. See the updates in Personalizing My Picture Frames.

img_6874

The next thing I bought was a multi-colored ball clock. This isn’t the clock I want for the long haul but it is cute and runs well. I really want one of the wooden atomic clocks but this one will work for the time being. I bought it off Amazon and put it together myself. I think it’s cute.

img_6877

I have also purchase a number of little knickknacks off ebay to place around the apartment. One of the first purchases was a pretty little orange ashtray. When my daughter saw it, her comment was “Why do you have an ashtray?” My answer? Buying an MCM ashtray is cheaper than purchasing an MCM bowl and I just needed something small to put change and my keys in. I also have my Aladdin teapot from the Hall China Company, my Drip-o-lator coffee pot also from the Hall China Company, and a cool looking vase. I really love stuff from the Hall China Company and have a lot more in storage back in Columbus. I got the vase because I have a matching tea…in storage in Columbus. I really need to get my stuff out here to Tucson. I’ve also made a number of purchases as I went Thrifting .

img_6886

A major purchase I’m really enjoying is my new couch and chair. I finally had to break down and replace the old stuff I’d been using for the last few years. I wanted grown-up furniture. I measured the long wall in the apartment so I would know exactly how long a couch would fit comfortably, while leaving room by the front door. Over to Sam Levitz I went with my daughter. Bronwyn doesn’t like MCM at all but I knew she would keep me from spending too much. I found this really nice set on sale that would fit in my apartment without making the room look super small and cramped. I wish it had come in a color other than grey but I can live with the color because I really like the MCM shape, while being new construction. It came with two of the grey and white pillows. I’ve since purchased additional MCM inspired pillows.

img_6873

I also found a really cool MCM coat rack that is a knock-off of the Eames Hang-It-All. You can read about why I decided on the coat rack I purchased and how I ended up hanging it in MCM Coat Rack.

img_6871


Cart Update, Part 2

My honorary grandkids came over today since school was closed for a long weekend. (Don’t get me going on how they don’t fund the schools here so kids are out all the freaking time so they can reduce costs.) Any way, the boys and I had a good time. We talked about what they wanted for Christmas (which is a ways out still), watered the plants, and they played Minecraft for hours and hours because I was working.

After I had finished working for the day, Junior asked if we could paint the cart. We decided to go for it. While he continued to play Minecraft, I started prepping the cart for paint. First, I gathered everything I thought I would need: sandpaper blocks, Goo Gone, paper towels, cleaners, and a screwdriver. I started just cleaning the whole thing since it has been sitting around for a while. It was a little dusty and had some dog hair on it. I keep telling Cian that he needs to keep his hair to himself, he is causing Mommy a lot of work but he just doesn’t seem to understand that concept.

cart19

After cleaning, I went to work on a couple of places that had stickers or tape. The first place was just one of those stickers you get on your banana or pepper. I tried using the sandpaper on it but that didn’t work very well. Then I tried using the Goo Gone but that did absolutely nothing. So I finally decided to just use the good ole’ screwdriver and scrap it off. That worked really well on the paper portion of the sticker. And the Goo Gone worked really well on the glue. One sticky place down, one to go.

The second part was on the handle where they decided to use a bazillion yards of tape to keep the price tag on. I mean, they just wrapped and wrapped that tape around the handle. So first I had to figure out where the tape started and ended to see if I could start there to unwrap it. That didn’t work…they’d wrapped it back on itself. I finally found a little pucker on one end of the tape. I got out my trusty screwdriver and went to work. It took a little while but I finally got the tape and price tag off. Used a little more Goo Gone and, Woo Hoo, I was ready for the next step in getting the cart ready to redo.

That is also where I ran into a major stumbling block. With my screwdriver in hand, I started to unscrew the handles from the trays. HUH! Nope, that wasn’t happening. Those screws were NOT going to budge. They didn’t care that I was ready to work. They didn’t care that I wasn’t going to throw them away but put the whole thing back together again once I finished painting everything. They just plain didn’t care. Markus decided that he would try, because being a 7-year old, he believes he is strong enough to take on anything. Huh, again nope. Junior took a break from playing Minecraft to give it a try, because being 9 is so much better. We finally just stared at the thing, ready to kick it, when Markus says, “My dad can do it. He is really strong.” That worked for me! Well, when Alfonso got here to pick up the boys, he couldn’t get them undone either. What he did notice is that we needed a wrench or ratchet set to undo the nuts on the back side of the screws. That was what was holding them in so tight. Alfonso said he would come back this weekend with the right tools to help me.

Friday was a vacation day for me so my friend, Sawnya, came over with her son to hang out. Later in the day, her husband showed up and we were talking about the cart. He took a look at it. He agreed that the nuts on the inside needed to be loosened and said he had a ratchet set in his car. He set to work, and in no time at all, my cart was laying on the floor in pieces. Thank you, Nick!

cart20

Looks like I have more cleaning to do because the bottom of those shelves look to be in pretty bad shape!

I waited until the next day but I now have all the shelves and the handles sanded and cleaned up. I’m ready to go. Then I start thinking, “Where am I going to do this?” I mean, I live in an apartment. So, there is no basement to use. I could take it outside but I don’t think the management would appreciate it much it I got paint all over my patio, or their grass or rocks (they use a lot of rocks out here in southern Arizona), regardless that I think Satin Lagoon is really pretty. Maybe I could take it over to my daughter’s place. I know she has a drop cloth I could use in her garage. But that means I won’t be able to start until I can make those arrangements.

Then I see it – that huge box sitting in my living room. I just got a shipment from Amazon of pillow inserts and they came in a great big box. I guess this is one time that be slow to take something out to the dumpster (read as just being lazy about it) is going to pay off for me. I open up that box and use it on my patio. Cian is finding the whole thing fascinating.

cart25

The one thing I bought when I first decided to do this project were these things called Painter’s Pyramid. I was worried about the edges of the shelves looking good.

cart27

And these are doing exactly what I wanted them to do! They keep the shelves up off their edges so I don’t have to worry about the paint making the shelve stick to the box. And they have turned out to be very handy when I turn the shelves over. I don’t have to worry about putting the new paint down on the cardboard. It just sits on those little points.

cart28

Everything seemed to be moving right along. I started painting while participating in my favorite Saturday habit, watching college football. And that worked out great b because I needed to wait at least an hour before putting on a second coat. So, I’d put on the first coat during the pre-game yakking, then a halftime I would put on the second coat. And when the game was over, I could turn the shelf over and spray the bottom. I decided to only use one coat on the bottom, because it was the bottom. It didn’t need to be perfect like the top. I still made sure everything was covered nicely but one coat was enough.

cart29

Since I could only do one shelf at a time, it took most of the day to do two of them. Which is when I noticed another little problem. I really thought that one can of spray paint would be enough. As I was shaking it after doing the bottom of the second shelf, I noticed there didn’t seem to be too much paint left in the can. Definitely not enough for the last shelf. Well, just fudge!!!

In order not to waste time, I decided to do the handles. I stood the box up against the patio wall and balanced the handle inside there. This turned out to be the perfect solution. I could only do one handle at a time and just had time to do one handle before it got too late. It did take two coats on both sides of the handle to make it look really nice. And now the inside of the box reminds me of the Tin Man from the Wizard of Oz.

cart30

For the night, I didn’t want to stack them up because they hadn’t had the time for the paint to really set. I was really afraid that leaning them up against each other would cause them to stick together. I ended up balancing the two shelves on the corners of the patio wall and left the handle in the box so they had a nice curing time.

I’m still waiting to get a new can of Satin Lagoon so I can finish painting the shelves. But in the meantime, I was thinking about how good it was going to look when I got it all back together again. And it hit me. What in the world did the screws look like? I mean, the shelves and handles both had rust and scrapes on them, chances are the screws were too. The screws and nuts were in a baggie on the counter so I took a look. Sure enough, they looked very sad… I needed to find a box or other piece of cardboard I could put the screws in so they would stay stand up. Don’t they look gorgeous now?

cart31

I got another can of the Satin Lagoon and finished painting the trays. Now the cart is ready to be put back together!

It took a while but I finally got my friend, Nick, to come back with his tools and put my cart back together. I just absolutely LOVE it. It is everything I envisioned it would be.

Thrifting

Valerie and I plan this blog post to be the ongoing documentation of our great finds when we go to thrift stores, garage sales, junk shops, or wherever we can find good deals.

July 29 (Peggy):

My neighbor and I decided to go thrifting. She was looking for something to throw on the couch to keep protect from her very young granddaughter. I wasn’t really looking for anything in particular but thought we might end up at the Dollar Tree, where I did need a few things.

I am sooooo glad I went with her. We hit two different thrift stores. At the first one, everything in the store was 20% off and I had a 10% off coupon too. I found a pair of Ray Rachel EVOO and vinegar cruets. They don’t have the stainless steel pour spouts. At $2.00 piece (before discounts), I figured I could get those on Amazon. I also found a pretty cool wine thingy. Not sure what you call it but you put the wine bottle in it so you can pour in a cool looking thingy. It was $2.00 too. All together, with discounts, l three items only cost $4.20.

Update: To make my Rachel Ray cruets useful, I went on Amazon. I found a set of six pour spouts for only $6.99. I gave them a really good washing and then waited for the pour spouts to arrive. It only took two days and they were here. I put my olive, grape, canola oil blend in the larger cruet and olive oil in the smaller one. I just LOVE them, especially since they ended up costing me on $5.13!

IMG_0447

We then went to the Goodwill. The daily color was orange, which means anything with an orange price tag was 50% off.

The clothes are at the front of the store. I always look to see if I can find shorts or Capris my size. I found two pairs of Capri pants and a pair of shorts. One pair of the pants and the shorts had an orange tag. Woo Hoo!!

IMG_0331

We headed back to housewares…and I hit the mother lode. First, I found a Paderno 4-blade spiralizer that looks to be almost new. It has everything in it and two of the blades still have the plastic protective tape on them. It was only $2.99. I looked on their website and found out it goes for $49.99. I got a really great deal. It doesn’t have the manual/recipe booklet but, if I can’t find it, it won’t be that big a deal.


The finally thing I was a really nice Brita pitcher. It also was only $2.99. I’ve been trying to get my neighbor to buy a Brita instead of all the bottled water she buys. She is disabled and has limited SNAP funds. While bottled water is covered by SNAP, my thought is why should she waste that money on bottled water when she just needs a pitcher with a filter. I didn’t let her know it was for her because she wouldn’t have let me buy it. I already have a Brita but it is just the plain one with green reservoir instead of white. This blue pitcher just needs a really good washing and, with the filters I gave her, she’ll be able to try it for a couple of months.

IMG_0332

July 22 (Peggy):i

Mom was here for a visit and the one thing she really loves to do is go antiquing. Our favorite antique store closed recently, so we had to find some new ones. We found a few very close o the house. So Mom, Bronwyn, and I were off for our adventure.

The first place we found was the Antique Village Mall. It was one of those antique stores with multiple stalls. The great thing? They were having a 20% everything at every stall but one. I found a couple of things I really liked but I had to narrow it done to just one. I ended up finding this really cool Royal Haeger. Royal Haeger is a well-known for their MCM pottery, and this one is the perfect color for my living room. Mom and Bronwyn didn’t find anything that they couldn’t live without even though there was much more stuff there that was their style then mine.

IMG_0340

Then we went to a store called Deja Vu Too. It was a much smaller store but she had a lot more MCM stuff for me. Bronwyn found a couple of antique herb cutters (or whatever you call them). Again I found a number of items that I would have loved to buy but I narrowed it down to just one. ;-(

IMG_0338

Our final stopped was at the Antique Resale Market Place. It is partial an antique store and partial resale/commission sales store. The vast majority of the merchandise was southwestern (which is any of our styles). I did find a bedroom suite that I would die to have. It was the whole thing: dresser, chest, night stand, headboard, and 2 mirrors. It was GORGEOUS! I told mom she needed to win the lottery so she could buy it for me. They had each piece priced separately, so we added it up. Overall, it would cost about $2500, which really isn’t bad for an entire bedroom suite…but alas, still out of my price range.

However I dd find a few things I decided to buy, stainless steel serving pieces that match the ones I purchased previously (see below). The divided and rectangle platters were fairly inexpensive. The bowl was only $4 and on sale for 50% off. I do love a good deal!

IMG_0343

IMG_0341

May 21 (Peggy):

Another long stretch between thrifting sessions.

Yesterday, my neighbor and I decided to make a trip to Goodwill. She had a few things she was looking for specifically, and me, I just go looking for deals. And I was lucky enough to find a few things. Update: I use the bottle in my bathroom to hold my mouthwash. It’s perfect and makes the counter look less cluttered.

IMG_8931

I also found a nice Vera Wang top. I checked it over really well to check for stains, rips, and the like. It looked in really good shape, so I snapped it up.

IMG_8939

The best part was that, as we were looking around, they came over the speaker and said that all donated items were 50% off. Talk about being in the right place at the right time! So, I got out of there for less than $8.00.

March 17 (Peggy):

It’s been a while since I’ve been thrifting. I don’t know why its been so long but…

This weekend I had a reason to go. I’m going to be dying some yarn and I needed a pan that I don’t use for cooking food. I don’t have any extra pots that I don’t use for cooking, so I knew I needed to hit the thrift stores to find an inexpensive pot. I went to one Goodwill and found 2 but they were both $13. There was no way I was spending $13 for one pot from Goodwill. So, off to the next thrift store.

And there I found what I was looking for…and more.

The first thing I found was a nice MCM looking lamp. I’ve been looking for a lamp for my bedroom and this one is really nice. The shade, while very cute, just doesn’t go with my current or planned color scheme but it will work until I can decide what I want for the long haul.

IMG_7446

Next, I went to the look for a pot. I found this really nice one for only $7. I snapped it right up. This will be perfect for dying yarn.

IMG_7445

The last thing I found was this cute little round vase. I love the shape and lines on it. Not sure about the color though. It’s sort of a dark peach. I wish it was more orange. It may be something that won’t stay. We’ll have to see.

IMG_7444

Feb. 4 (Peggy):

I went to Goodwill again today. There wasn’t a whole lot but I got a couple of really nice wine glasses. One has opaque dots and the other as a frosted stem. This gives me a total of 6 wine glasses, every single one different than the others. The more I look at the one with the frosted stem, the more I think I may re-donate it but for now, it is in the cabinet.

img_6491

I also found this really nice amber colored bowl. I’m not sure I’m in love with it, or what I’ll do with it but for only $4 (and it was half off that), it was a good buy. If it ends up not really fitting in with my future plans, I’ll just donate it again so that someone else can use it.

img_6490

The final item I found was a square, white plate I found really interesting. Since my dishes are white too, this will work well for serving plate or luncheon plate. Not sure, but I like it.

img_6495

Jan. 21 (Peggy):

I love going to thrift and antique stores. I love looking for the hidden gem that is just exactly what I’m looking for…and sometimes what I’m not looking for. What I like is more likely to be in my price range when I’m at a thrift store then an antique store, especially since I am very much into mid-century modern.

Yesterday I went thrifting with my new neighbor. I was looking for, of course, items that would fit into my mid-century modern theme.

The first items I found weren’t on my list but they were items that I just had to have: a beautiful 13 ½ inch cast iron skillet and an almost new bread machine.

The skillet had very little rust on it and it didn’t take much to me to get it all off when I got home. A short soak in super how water, a good scrubbing with a copper pad, and some additional scrubbing with salt and a sponge and it was ready to be seasoned. A little oil and an hour in the over and it was ready! Update: The first thing I cooked in the pan was a rib-eye steak. The only other pans I have are non-stick, so the cast iron skillet let me get a really great sear on the outside before finishing it off in the oven. 

cast-iron-skillet

The bread machine was in really good shape, like I said it looked like it was almost brand new. It didn’t have the owner’s manual/recipe book, but I figured I could download it once I got home. The bread pan was a little dirty but a quick soak and scrub and it was good to go. I’m really looking forward to making my own bread. Update: A few days later, my neighbor found the exact same bread machine at a Goodwill store on the other side of town. Her’s came with the manual/recipe book. So, I didn’t have to download the book, I just copied hers. I picked out a couple of bread recipes I wanted to make and went to the grocery store to get the ingredients. I mean, I don’t even have flour in my pantry. The first load I made was Country French bread. It was delicious! 

bread-machine

The next item I found was an interesting wine glass. I have a collection of wine glasses with no two being the same. I mean, I really don’t have any pairs of matching wine glasses let alone an entire matching set. It certainly makes it easy to recognize your glass during a party. This one has an almost bronzy color on the outside. It was the only one and I snapped it up. There were three matching champagne glasses but I wasn’t interested in them. I just don’t drink a lot of champagne.

The other items I found were things that would be perfect in my new décor. I found two platters that look like they came directly from the 50’s and 60’s, an atomic looking fruit bowl (which I may end up changing the color and hanging on the wall), a very inexpensive vase that’s plastic but I love the shape, and a kitschy ceramic butterfly candy dish (which also may end up on the wall). Update: I ended up painting the vase copper and I really like it better now. 

montauge-1

stainless-platters

Update: I found a few more pieces of this stainless steel serving dishes (see above).

butterfly-dish

Update: This is now hanging on my wall. Love it! You can see a picture in Personalizing My Picture Frames

I am so looking forward to my next trip!

Cart Update

I really, really, really needed to update the look of my apartment. I had a bunch of older, mismatched stuff. It definitely did not look the apartment of a grown up.

As I started looking around, I realized that with apartment living you really shouldn’t have a lot of heavy furniture. From being in other people’s apartments who had big, bulky, poufy furniture, the place just looked smaller and more crowded. So, for the average size apartment (and depending on the layout), you need to limit what size, bulk, and amount of your furniture and accessories.

After looking at a lot of pictures online, I decided I love Mid-Century Modern. I love the colors. I love the lines of the furniture. And in an apartment, it provides a cleaner, more spacious look. So, I started looking for pieces and discovered it can be really expensive. I mean, really expensive! There was no way I was going to be able to afford to buy mid-century modern furniture.

I needed to change my way of thinking and find other ways to find the mid-century modern furniture I wanted, while not busting my paycheck. The answer? Thrift stores, craigslist, garage sales, and lots of elbow grease.

So, I started looking at craigslist almost every day. Very often I would find something I liked…usually when I didn’t have any money or it was still out of my price range. And if I had the money, I’d contact the person and it would already be gone.

I also started haunting thrift stores, especially Goodwill and the Salvation Army. I’m always reading these online stories about how amazing it is what people give away. To hear them talk about it, they are always finding some rare piece of art or whatever. Can I just say, I have not had that kind of luck. I have found a few things that will go well in a mid-century modern décor. Candlesticks. A plate. (Not much, huh?)

I did find one item that I’m really excited about. I found it at a thrift store run by a church. It was a really nice place, everything was organized and clean. That’s where I found the plate. I also found some wine glasses for $1 or less. The wine glasses aren’t necessarily mid-century modern but they are big and that is the most important thing when picking out wine glasses. But the thing I found that really excited me is a cart. It will look absolutely perfect on my patio.

cart05

It is pretty cool. And you wouldn’t believe what it cost?!? Yes, that’s right, just $7.50.

cart06

Now, admittedly it needs some work but isn’t that what Rust-Oleum is for? So, my next stop was Home Depot to look at spray point. Man, there are a lot of colors. I ended up going with Satin Lagoon for the shelves and Metallic Silver for the handles. I’m not sure that the Satin Lagoon is really a mid-century modern color but I like it and think it will look fantastic. I’m not sold on the Metallic Silver, which is really just chrome, but it was the only type of silver at the store. I’m going to go ahead and use it…and if I don’t like it, I’ll just buy another shade of silver, hopefully there will be something else in stock by then or at a different store.


So, it looks like I’m all ready to get going on my little project.

Check out Card Redo, Part 2 to see how that goes.