Best Dog Treats Ever – Asparagus Jerky!

Hey Peg!

I just made the cheapest, tasty dog treats ever. Rufus loves them and they are made from scraps!

You know how crazy I am about pet food. It has to nutritious, tasty and, for Mom, cheap. Well, I found it. Asparagus Jerky! Let me ‘splain.

Remember how Pete’s cancer at 5 and death at 10 put me on a mission to keep Poncho healthy? I spent 2 years making his food from venison, brown rice and asparagus or broccoli.  I found that Poncho loved, loved, loved asparagus. He only “liked” broccoli. Anyway, it was a lot of work and it was hard to make sure that I had time. I stopped doing it, but I never stopped 1 thing. I still saved the stem ends of the asparagus to treat him when I was cooking. Don’t know if it made a difference, cancer got him too. But, he stayed with me for almost 17 years.

The other day, I was making dinner, breaking off the ends of the asparagus, and setting them aside for Rufus. I don’t like to give him more than 1 or 2 as treats per day (who wants to risk the “runs”?), so there are always more ends than he needs. Then it struck me; why not make jerky?! Why not cut them into smaller pieces and dry them in the NuWave oven. I even used the whitish, really tough stalks ends. No oil or flavorings. He loves them!

Now instead of him getting into the garbage, I’m feeding him the garbage and he thinks it’s great!

Here’s how I made Asparagus Jerky:

I put some parchment paper on the grill of the NuWave. I didn’t use any oil or spray because I wasn’t planning on adding any flavor later.

Asparagus Jerky 1

I broke off the ends to the asparagus we’d had for dinner and cut the pieces down to about 1 inch.

I set the NuWave to 175 degrees. Since I know you don’t have a NuWave, use the same temperature for your conventional oven.

Then, I spread the end pieces out on the grate.

Asparagus Jerky 2

Finally, I set the timer for 1 ½ hours and walked away.

When they’re done, they will be really shriveled and not pretty.

I let them cook down before placing them in a paper bag. I learned the hard way not to place them in a plastic container because they got soggy-ish. The paper bag lets them continue to dry out without getting moldy.

Asparagus Jerky 3

I know they don’t look like much, but every time Rufus goes out and does his business, he gets one of these. He loves his “Sparaguses”!

Stone Trivets

I was bored. I hate it when I’m bored because I usually do stupid things like eat too much. And since I’m trying to lose some weight, I like to make sure I’m not bored.

So, I started looking for something interesting to do that wouldn’t cost me too much, as it was in between paydays. I had no idea what I wanted to do or what I had the materials to do. I don’t have a lot of supplies here in Arizona yet but I look through those that I had. It was sparse.

So then I started looking around on Pinterest. I kept seeing these trivets made with small rocks or stones. The posts I saw had the small rocks hot glued to felt. I liked the idea of the stone trivets but really thought the felt would just be too floppy.

I had purchased a set of four cork tiles a while back. I had thoughts of making my own corkboard but just never got around to it. And now I’ve found one I really liked on Amazon, and purchased it. I decided the cork would be a good base for the trivets. I also knew that a great place to get the stones I needed was at the Dollar Store.

I made a quick trip to the Dollar Store on Saturday and picked up a couple of bags (along with a few other things I couldn’t seem to live without). Does anyone else have that problem? You go in to the store for something specific and come out with a couple of bags of stuff. And half the time, I forget the item I actually went in for.

So today, I gathered up my supplies and started to work. I thought about using one of my luncheon plates or soup bowls as the pattern for the trivets. However, the soup bowls were too small and the luncheon plates weren’t round. Exactly how did I not remember my plates are square? But I did find the top to the canister I keep my tea in and figured it was just the perfect size. This is actually supposed to be the flour canister but I drink a LOT of tea. My flour I keep in plastic bags so I can store more in a smaller space, while not having to worry about bugs getting in it.

I traced around the outside of the lid to form the circle.

IMG_7603

After cutting it out, I placed the rocks around trying to get the most coverage and an fairly even top.

IMG_7606

After cutting it out, I placed the rocks around trying to get the most coverage and a fairly even top.

Then I started gluing them down. And let me tell you, it is not as easy as you would think it should  be to try to glue them down in the same place where I’d placed them while the designing it. The rocks kept scooting around and slipping. In the end, I just did the best I could at putting them back where I thought they went.

IMG_7610

And here is what it looked like at the end. Now, I’m really glad I used cork for the base, because even though you can see it, it looks like it goes with the rocks.

IMG_7612

For a first try, this isn’t bad. But there seems to be too much space between the stones. I wish I had some very, very small rocks to put in-between the bigger ones, or sand, or just something.

IMG_7613

IMG_7614

I had enough cork left over for another round trivet, so I went ahead and cut it out. However, I really wanted to use one of my plates as the pattern since I liked the shape – obviously since they are my plates. But once I cut it out, it really didn’t end up looking all that different from the round ones.

I ended up giving one of the round trivets to my neighbor. She loved it. I gave the other round one to my daughter. She wasn’t all that impressed. In fact, her comment to me was “Getting crafty there, Mom?” She is really not into home made things unless it is her organic face wash, body wash, and other beauty products. Her partner and his son both loved them. Marcus wanted it for himself. Bronwyn said he carried it around all night.

Cart Update, Part 2

My honorary grandkids came over today since school was closed for a long weekend. (Don’t get me going on how they don’t fund the schools here so kids are out all the freaking time so they can reduce costs.) Any way, the boys and I had a good time. We talked about what they wanted for Christmas (which is a ways out still), watered the plants, and they played Minecraft for hours and hours because I was working.

After I had finished working for the day, Junior asked if we could paint the cart. We decided to go for it. While he continued to play Minecraft, I started prepping the cart for paint. First, I gathered everything I thought I would need: sandpaper blocks, Goo Gone, paper towels, cleaners, and a screwdriver. I started just cleaning the whole thing since it has been sitting around for a while. It was a little dusty and had some dog hair on it. I keep telling Cian that he needs to keep his hair to himself, he is causing Mommy a lot of work but he just doesn’t seem to understand that concept.

cart19

After cleaning, I went to work on a couple of places that had stickers or tape. The first place was just one of those stickers you get on your banana or pepper. I tried using the sandpaper on it but that didn’t work very well. Then I tried using the Goo Gone but that did absolutely nothing. So I finally decided to just use the good ole’ screwdriver and scrap it off. That worked really well on the paper portion of the sticker. And the Goo Gone worked really well on the glue. One sticky place down, one to go.

The second part was on the handle where they decided to use a bazillion yards of tape to keep the price tag on. I mean, they just wrapped and wrapped that tape around the handle. So first I had to figure out where the tape started and ended to see if I could start there to unwrap it. That didn’t work…they’d wrapped it back on itself. I finally found a little pucker on one end of the tape. I got out my trusty screwdriver and went to work. It took a little while but I finally got the tape and price tag off. Used a little more Goo Gone and, Woo Hoo, I was ready for the next step in getting the cart ready to redo.

That is also where I ran into a major stumbling block. With my screwdriver in hand, I started to unscrew the handles from the trays. HUH! Nope, that wasn’t happening. Those screws were NOT going to budge. They didn’t care that I was ready to work. They didn’t care that I wasn’t going to throw them away but put the whole thing back together again once I finished painting everything. They just plain didn’t care. Markus decided that he would try, because being a 7-year old, he believes he is strong enough to take on anything. Huh, again nope. Junior took a break from playing Minecraft to give it a try, because being 9 is so much better. We finally just stared at the thing, ready to kick it, when Markus says, “My dad can do it. He is really strong.” That worked for me! Well, when Alfonso got here to pick up the boys, he couldn’t get them undone either. What he did notice is that we needed a wrench or ratchet set to undo the nuts on the back side of the screws. That was what was holding them in so tight. Alfonso said he would come back this weekend with the right tools to help me.

Friday was a vacation day for me so my friend, Sawnya, came over with her son to hang out. Later in the day, her husband showed up and we were talking about the cart. He took a look at it. He agreed that the nuts on the inside needed to be loosened and said he had a ratchet set in his car. He set to work, and in no time at all, my cart was laying on the floor in pieces. Thank you, Nick!

cart20

Looks like I have more cleaning to do because the bottom of those shelves look to be in pretty bad shape!

I waited until the next day but I now have all the shelves and the handles sanded and cleaned up. I’m ready to go. Then I start thinking, “Where am I going to do this?” I mean, I live in an apartment. So, there is no basement to use. I could take it outside but I don’t think the management would appreciate it much it I got paint all over my patio, or their grass or rocks (they use a lot of rocks out here in southern Arizona), regardless that I think Satin Lagoon is really pretty. Maybe I could take it over to my daughter’s place. I know she has a drop cloth I could use in her garage. But that means I won’t be able to start until I can make those arrangements.

Then I see it – that huge box sitting in my living room. I just got a shipment from Amazon of pillow inserts and they came in a great big box. I guess this is one time that be slow to take something out to the dumpster (read as just being lazy about it) is going to pay off for me. I open up that box and use it on my patio. Cian is finding the whole thing fascinating.

cart25

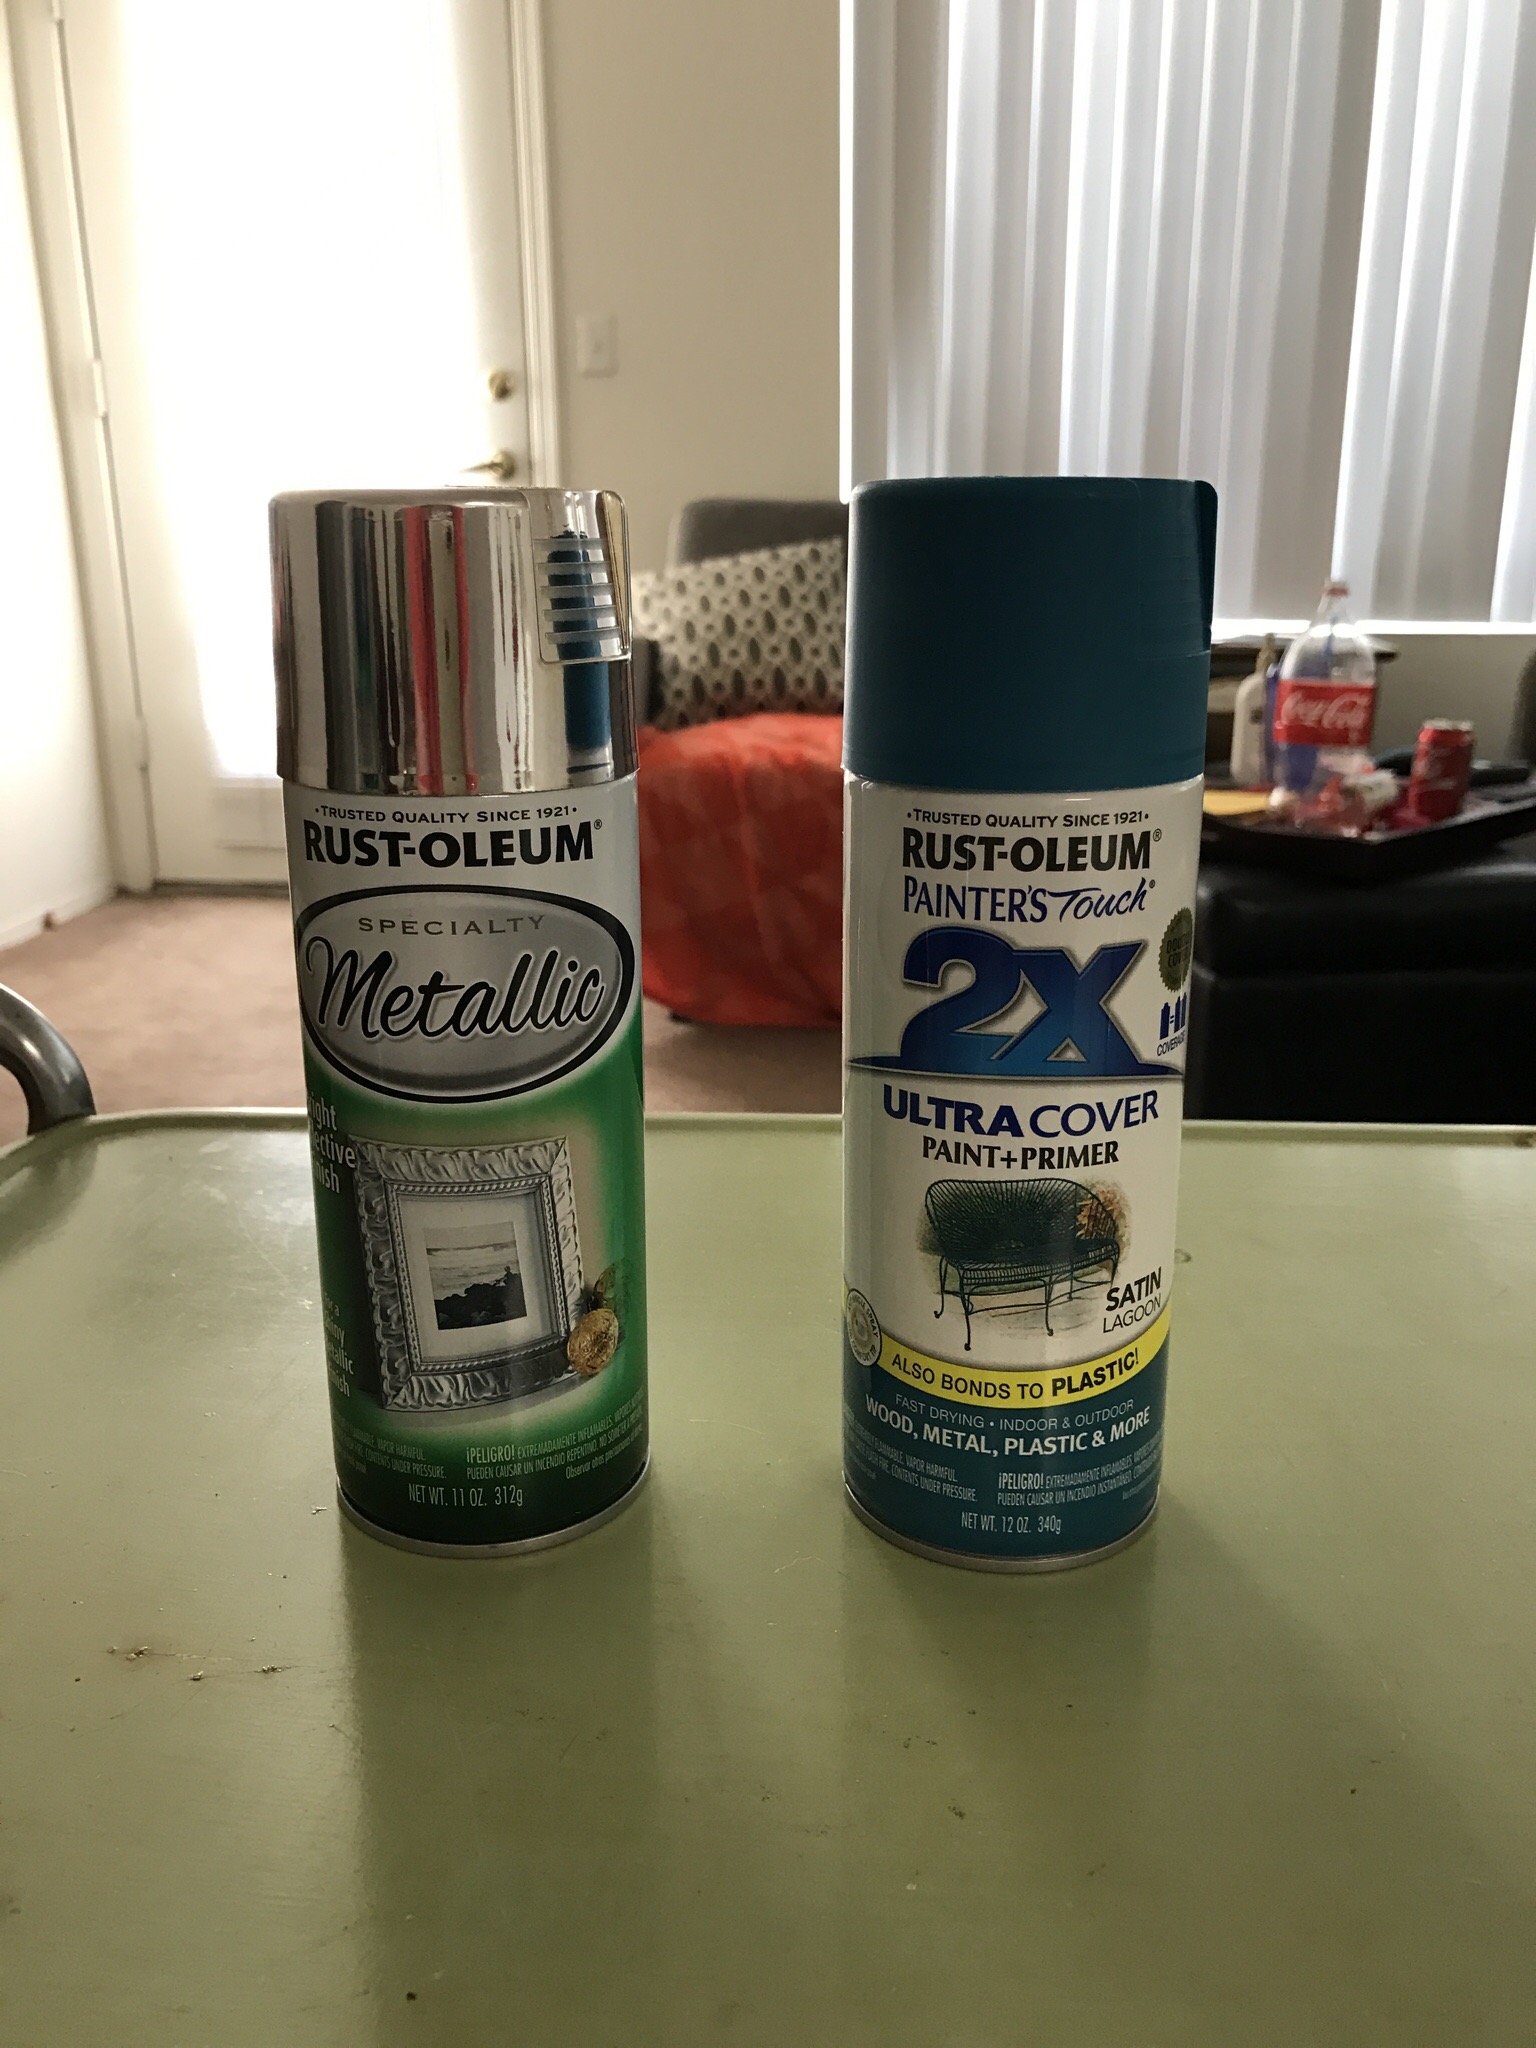
The one thing I bought when I first decided to do this project were these things called Painter’s Pyramid. I was worried about the edges of the shelves looking good.

cart27

And these are doing exactly what I wanted them to do! They keep the shelves up off their edges so I don’t have to worry about the paint making the shelve stick to the box. And they have turned out to be very handy when I turn the shelves over. I don’t have to worry about putting the new paint down on the cardboard. It just sits on those little points.

cart28

Everything seemed to be moving right along. I started painting while participating in my favorite Saturday habit, watching college football. And that worked out great b because I needed to wait at least an hour before putting on a second coat. So, I’d put on the first coat during the pre-game yakking, then a halftime I would put on the second coat. And when the game was over, I could turn the shelf over and spray the bottom. I decided to only use one coat on the bottom, because it was the bottom. It didn’t need to be perfect like the top. I still made sure everything was covered nicely but one coat was enough.

cart29

Since I could only do one shelf at a time, it took most of the day to do two of them. Which is when I noticed another little problem. I really thought that one can of spray paint would be enough. As I was shaking it after doing the bottom of the second shelf, I noticed there didn’t seem to be too much paint left in the can. Definitely not enough for the last shelf. Well, just fudge!!!

In order not to waste time, I decided to do the handles. I stood the box up against the patio wall and balanced the handle inside there. This turned out to be the perfect solution. I could only do one handle at a time and just had time to do one handle before it got too late. It did take two coats on both sides of the handle to make it look really nice. And now the inside of the box reminds me of the Tin Man from the Wizard of Oz.

cart30

For the night, I didn’t want to stack them up because they hadn’t had the time for the paint to really set. I was really afraid that leaning them up against each other would cause them to stick together. I ended up balancing the two shelves on the corners of the patio wall and left the handle in the box so they had a nice curing time.

I’m still waiting to get a new can of Satin Lagoon so I can finish painting the shelves. But in the meantime, I was thinking about how good it was going to look when I got it all back together again. And it hit me. What in the world did the screws look like? I mean, the shelves and handles both had rust and scrapes on them, chances are the screws were too. The screws and nuts were in a baggie on the counter so I took a look. Sure enough, they looked very sad… I needed to find a box or other piece of cardboard I could put the screws in so they would stay stand up. Don’t they look gorgeous now?

cart31

I got another can of the Satin Lagoon and finished painting the trays. Now the cart is ready to be put back together!

It took a while but I finally got my friend, Nick, to come back with his tools and put my cart back together. I just absolutely LOVE it. It is everything I envisioned it would be.

Peanut Butter – Take 2

As I’ve said before, I really love peanut butter. However, I decided to stop buying process peanut butter (goodbye Skippy) that contained way too much sugar and salt. Well, actually my daughter made that decision for me.

My first attempt at making peanut butter turned out pretty good. The flavor was excellent but the texture wasn’t what I was looking for. When I add the last ¼ cup of peanuts to make it chunky, it added chunks as well as peanut dust. So, it was grainy. Now, I don’t know if you’ve very had grainy peanut butter but it leaves a whole lot to be desired. I mean, I ate it but it was a little like eating really good tasting mud pie or sand from the sandbox.

I decided that it was time to try again and see if I could make some really great tasting, super-duper, chunky peanut butter. I also decided I would do a much better job timing how long it took to get the smooth consistency I wanted and taking pictures as I went along.

Again, I was totally surprised by how loud it was. It is really, really loud! Cian made his objections heard over the food processor. Lord have mercy!! I am really going to have to get ear plugs or something.

As you can see, it goes through a number of stages. I missed the photo of when it turned into a little dough ball. I didn’t remember it doing that the first time and just thought, “Crap! I’ve screwed it up. What did I do wrong?” But I figured I had nothing to lose by letting it run a little longer and, wa-lah, it loosened up again and started to look like peanut butter again, instead of a hot mess.

pb06 1 minute

pb09 2 1/2 minutes

pb12 Approximately 4 minutes

pb14 5 minutes

Then to get super chunky peanut but without the grainy texture, I decided to remove the smooth peanut butter from the food processor before making the chunks. I thought I would have to put the peanut chunks through a sieve to get rid of the dust. But I didn’t have to.

As you can see, all of the dust stuck to the residue left in the bowl. This left me with some nice chunks to add to my smooth mixture. To be on the safe side, I still poured them into the sieve. I really DID NOT want to have grainy peanut butter again.

pb16 
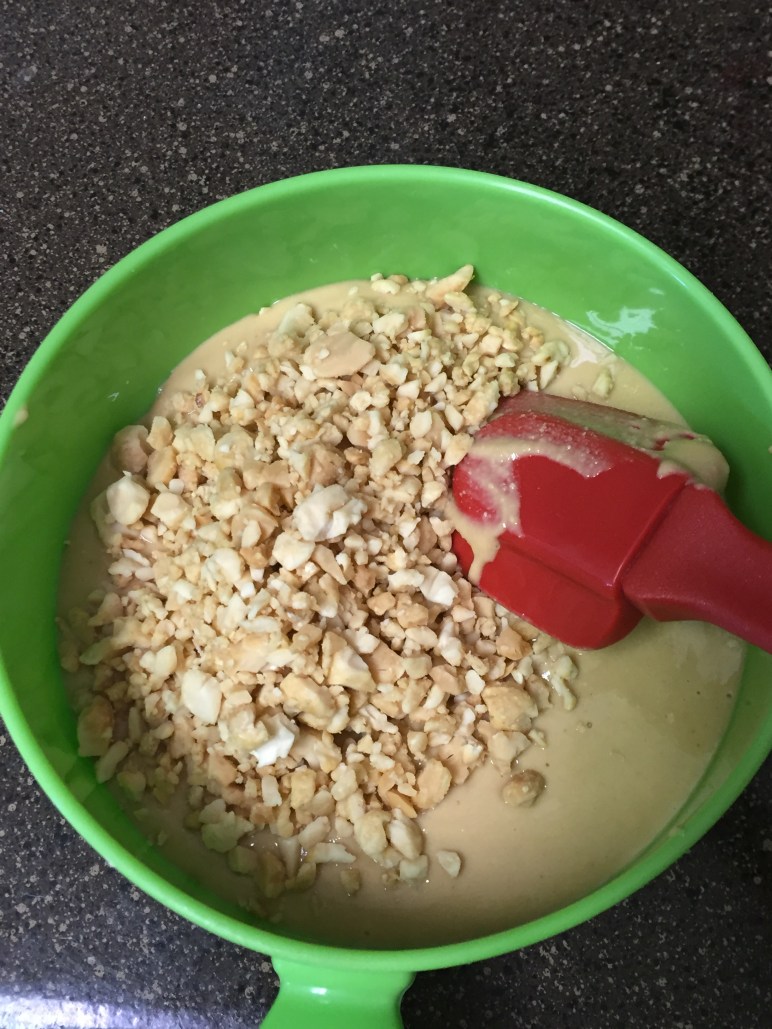
The super-duper chunks.

pb18 Adding the chunks.

I thought I was all done. I took a little taste and it became very clear I had forgotten something. I quickly stirred in a scant ¼ teaspoon of my super fine pink Himalayan salt and a scant ¼ teaspoon of stevia.

I now have great tasting super chunky peanut butter with the perfect texture! I’ve added the updated recipe below.

pb20

I was already to make myself a PB&J (organic red raspberry preserves) and discovered I was out of bread. No peanut butter sandwich for me. I am greatly disappointed. I am going to have to postpone my pleasure until later.

Super Duper Homemade Chunky Peanut Butter

Ingredients

  • 1 ¼ cup unsalted, roasted peanuts, separated
  • ¼ tsp finely ground salt, or to taste (I used pink Himalayan salt)
  • ¼ tsp stevia, or to taste

Directions

  1. Place 1 cup of peanuts in bowl of food processor.
  2. Grind peanuts until smooth. This could take approximately 5 minutes, so be patient.
  3. Add salt & stevia and pulse to combine.
  4. Remove peanut butter from food processor bowl.
  5. Add remaining ¼ cup of peanuts to food processor.
  6. Pulse until you receive the desired chunk size.
  7. Place peanut chunks in fine mesh sieve to separate peanut dust from chunks.
  8. Add chunks to smooth peanut butter and stir to combine.


Cart Update

I really, really, really needed to update the look of my apartment. I had a bunch of older, mismatched stuff. It definitely did not look the apartment of a grown up.

As I started looking around, I realized that with apartment living you really shouldn’t have a lot of heavy furniture. From being in other people’s apartments who had big, bulky, poufy furniture, the place just looked smaller and more crowded. So, for the average size apartment (and depending on the layout), you need to limit what size, bulk, and amount of your furniture and accessories.

After looking at a lot of pictures online, I decided I love Mid-Century Modern. I love the colors. I love the lines of the furniture. And in an apartment, it provides a cleaner, more spacious look. So, I started looking for pieces and discovered it can be really expensive. I mean, really expensive! There was no way I was going to be able to afford to buy mid-century modern furniture.

I needed to change my way of thinking and find other ways to find the mid-century modern furniture I wanted, while not busting my paycheck. The answer? Thrift stores, craigslist, garage sales, and lots of elbow grease.

So, I started looking at craigslist almost every day. Very often I would find something I liked…usually when I didn’t have any money or it was still out of my price range. And if I had the money, I’d contact the person and it would already be gone.

I also started haunting thrift stores, especially Goodwill and the Salvation Army. I’m always reading these online stories about how amazing it is what people give away. To hear them talk about it, they are always finding some rare piece of art or whatever. Can I just say, I have not had that kind of luck. I have found a few things that will go well in a mid-century modern décor. Candlesticks. A plate. (Not much, huh?)

I did find one item that I’m really excited about. I found it at a thrift store run by a church. It was a really nice place, everything was organized and clean. That’s where I found the plate. I also found some wine glasses for $1 or less. The wine glasses aren’t necessarily mid-century modern but they are big and that is the most important thing when picking out wine glasses. But the thing I found that really excited me is a cart. It will look absolutely perfect on my patio.

cart05

It is pretty cool. And you wouldn’t believe what it cost?!? Yes, that’s right, just $7.50.

cart06

Now, admittedly it needs some work but isn’t that what Rust-Oleum is for? So, my next stop was Home Depot to look at spray point. Man, there are a lot of colors. I ended up going with Satin Lagoon for the shelves and Metallic Silver for the handles. I’m not sure that the Satin Lagoon is really a mid-century modern color but I like it and think it will look fantastic. I’m not sold on the Metallic Silver, which is really just chrome, but it was the only type of silver at the store. I’m going to go ahead and use it…and if I don’t like it, I’ll just buy another shade of silver, hopefully there will be something else in stock by then or at a different store.


So, it looks like I’m all ready to get going on my little project.

Check out Card Redo, Part 2 to see how that goes.