Trying Out Meal Delivery

For the last few years meal delivery services seem to have become more and more popular. I know I have seen the ads for a long time. I’ve never used them myself but I did get my daughter a promotional membership to one of the services a while back when she was moving. I figured it would relieve some pressure and work for her. But I didn’t ordered any for dinners for myself.

So, the other day, an agent for one of meal delivery companies, Hello Fresh, knocked on my door, offering a pretty good special. (FYI, this is not a sponsored post.) I could get their Classic Plan of 3 meals for 2 people for only $39.99 per week. For me, that is less than $6.75 per meal. That’s much cheaper than eating out, even at McDonald’s or Wendy’s. I thought that was pretty good, so I signed up. The special pricing was for two weeks, so I decided to go for it. I don’t know if I’ll keep it up once the special pricing is over because the price increases to $59.99 a week. We’ll have to see.

Anyway, for my first week’s meals, I received:

  • Sesame Beef Tacos with Quick Pickled Veggies and Spicy Crema
  • Chicken Lo Mein with Carrots and Green Beans
  • Breakfast Bacon Quesadilla Stacks with Poblano Hash Browns, Avocado, and Bacon

I first box was delivered. It’s nice that I work from home but I didn’t hear it delivered and Cian did not put a din either. I was a little concerned about the food because I do live in Tucson, Arizona and it was a fairly hot day. But I didn’t need to be. The packaging is beyond compare. Too bad I forgot to take a picture, but I’ll get one with the next box. When I opened the box, everything was wrapped in a thick packing material. Under that were three boxes just a little bit larger than a Velveeta box, one for each meal. Below those boxes was a separate compartment where I found the meat and udon noodles. I put everything in the fridge and saved the really fantastic reusable long-lasting freezer gel sheet. The meat was so cold and the gel sheet was still partially frozen.

Chicken Lo Mein

The first meal I made was the Chicken Lo Mein. I pulled out the wonderful menu card with all of its’ step-by-step instructions with pictures.

I got everything out of the refrigerator to make sure everything was in the box (I probably should have checked that right off). They really do provide everything expect the very basics. You can see the green beans, carrots, green onions, mushrooms, udon noodles, garlic, and ginger. The little fish contains soy sauce and the little jar is hoisin sauce.  I forgot to include the chicken, it was still in the fridge, but it included a package of chicken tenders (enough for two).

Chicken Lo Mein 1

I cleaned and chopped the vegetables I needed to. The directions said to chop the garlic and ginger but I decided to grate them instead.

Chicken Lo Mein 3

The chicken tenders were supposed to be left in large pieces. I’ve never been a fan of really large pieces of meat in my Chinese food, so I cut them into much smaller, bite size pieces and threw them in the skillet to brown.

Chicken Lo Mein 2

Then I removed the chicken from the skillet and sautéed the vegetables and made the sauce (probably should have done that right after prepping the veggies).

I added the chicken back in, then the noodles and finally the sauce.

I have to say, I was impressed by Hello Fresh. The directions were simple and easy to follow, and having everything for one meal all together made it so easy. And most of all, I didn’t have to think about what I was going to make for dinner. I decided that when I made the choices for my box. I hate having to think about what I’m going to have for dinner after working all day…and cooking for one is just so much trouble and bother. It does look like I should have used my larger skillet, things are started to fall out as I stirred.

The meal was absolutely delicious! And since I get the meals for two (the smallest quantity available), I had more than enough left over for lunch or dinner the next day. (Wonders of wonders, I think it actually looks a little like the picture on the recipe card.)

I was going to add he preparations of the other two to this post too but it is getting waaayyyyy to long. FYI, the Breakfast Bacon Quesadilla Stacks with Poblano Hash Browns, Avocado, and Bacon was absolutely delicious!

New Christmas Tree Skirt

I’m slowly redoing my home with mid-century modern furniture and accessories. So far, the living room and dining room are looking pretty good. I still need more accessories but I can do that slowly so I can get the pieces I really want.

As part of the make-over, I decided I needed to think about changing up my Christmas decorations too. The first thing I thought about was my Christmas tree. After all, the tree is the show piece of everyone’s Christmas decorations.

My first purchase? A silver tinsel tree. That was the iconic tree of the time period. There was no way I could afford a real antique one — mid-century modern is so freaking expensive. I started looking online for a reproduction. Ugh! The ones that look most like the originals are still too way expensive too, even a smaller one that would fit nicely in my apartment. I’m going to have to save up for one of those.

What I did find was an inexpensive one on Amazon, it is no longer available so I can’t provide a link. I also started looking for a tree topper. I knew I wanted one of the atomic looking ones. Again, the real thing was out of my price range. However, I was luckier finding a really great reproduction. I found a great 11 ½ inch starburst on Amazon. I was worried that it wouldn’t look as good as I hoped. However, it is perfect.

Then I got out the ornaments I used last year. While not being particularly MCM, I found they looked just fine. I’ll eventually get new ones but these will work this year.

IMG_5471

Finally, the only thing missing was a great tree shirt. I couldn’t find any originals, within or outside my price range. I looked for reproductions but the few I could find still were not within my price range. So I decided to make my own. I started looking for mid-century modern fabric to use. While there is quite a bit of MCM fabric out there, the amount of Christmas fabric is limited. I couldn’t find anything I liked. The piece that kept coming up in all my searches was this piece with birds sitting on a limb with an orange background. I mean, really, orange? For Christmas? I love orange. I love mid-century modern. But I do not love mid-century modern orange Christmas fabric!

So, after doing more research, I decided I would make one out of felt. I knew I was going to be really busy at work, so I went to my old standby (and favorite) retailer, Amazon. I purchased the following materials:

My idea was to make the skirt itself from the red felt and then use the multi-colored swatches to make cutouts of mid-century modern ornaments to place around the skirt. I figured it would take me “no time at all” to have the tree skirt finished and under the tree. Oh boy, was I wrong. Cutting out the skirt turned out to the easiest part of this little endeavor.

First, I measured how far far I wanted the tree skirt to hang. I decided on 12 inches. Then I cut a piece of the red felt that would be large enough for the size I wanted. I folded it in half, half again, and then again until I had a nice little triangle that would make it easy to cut a circle. Using the tape measure, I measured out 12 inches along the edge. I cut along that edge to make the circle. I then cut off the tip of the triangle to make the hole for the tree trunk. I unfolded the circle and trimmed any unevenness in the outer circle so it was nice and round. Finally, I cut from the outer edge to the middle to make the opening so I could put it around the tree. That took all of about 30 minutes.

collage

IMG_5482

Then I started working on the ornaments. I did a lot of researched, looking for what ornaments looked like during that time period. Then I tried to cut them out and decorating them freehand…with mixed results. A few turned out okay, the rest looked like total crap. I was really disappointed. So much for thinking it was going to be easy.

IMG_5748

So, I started looking for printable ornament patterns. I found a number I really liked and went to print them out.

Aannnddd, my printer decided it wasn’t going to recognize the color ink cartridge. I couldn’t print them out even though I had it set for black only. UGH!!!!!! With Christmas being so close, I really wanted to finish the tree skirt.

So I resigned myself to going to Just using it plain and working on it again after Christmas.

In the meantime, I was also collecting a few other MCM Christmas decorations. I found a couple of felt stockings on Amazon that were kind of cute. When I got them, I thought they were cute, not great, but would be good enough for now. But then I went to Lowe’s, I found some I really wanted. So, I snapped up two at 50% off along with a matching door mat.

IMG_5743

I was going to just throw the two felt ones away (I’d only bad $2-3 for them) since the loop was already looking like crap because I used tape to hold them to the front of my TV credenza. But the more I looked at them, the more I thought that I could use the figurines (Santa and a reindeer) on the front for my tree skirt.

I cut out the reindeer, Santa, the candy cane, and the Ho! Ho! Ho!.

IMG_5744

I placed those around the tree skirt, as well as the few ornaments I thought were decent.

IMG_5746

After gluing everything down. I placed it back under the tree. It looks fairly nice and, overall, I like it.

Is it want I want forever? Definitely not. But it’s cute enough that I now have the time to find the PERFECT tree skirt.

IMG_5749

DIY Washi Tape Storage

If you remember the post glue gun storage, I said that I was going to be making washi tape storage that would coordinate with it.

It took me a while to get back to it but I finally got back to it. This is what I needed for my washi tape storage:

IMG_2766

(You can see the glue gun storage in the background.)

  • 8×10 picture frames
  • Rule
  • Utility knife
  • Set of three storage baskets, blue
  • Small easel
  • Double-sided tape
  • Glue gun and glue sticks
  • Craft paper (same as I used for the glue gun storage)

The first thing I did was take apart the picture frame.

IMG_2768

I used the back piece to measure the background paper. So that the cuts were very clean, I used the utility knife.

IMG_2769

put double-sided tape all over the back of the paper to adhere it to the back of the picture frame, like I did for the glue gun storage.

IMG_2770

I put the picture frame back together, using the glass but not the ‘picture’ that comes with the frame. I used the glass so I’d have something to glue the baskets to. Then I ran a line of hot glue around the back to make sure the back didn’t fall out.

IMG_2777

I put the picture frame in the easel just to see what it would look like. Thankfully, I did because it pointed out a few things.

IMG_2771

As you can see, the picture frame leans back pretty far. I don’t like the look of this. I don’t like it one little bit.  I have to find a way to get to sit more upright.

I’d planned on gluing the first basket on the bottom of the frame.

Welllllll, that’s not going to work because the bottom of the frame is inside the easel. Time to rethink the basket placement.

I don’t know if you can see it in this picture very well but the front part of the easel was wonky. While one side of the front brace rested on the table, the other side did not. UGH! Why didn’t I check that before putting in my basket? Or maybe I did and it got bent while it was in the bag…who knows. But now I have a problem to solve.

IMG_2772

So, I got out the tools and started pounding and twisting and squeezing. It got a little better, enough that I’m good with it.

IMG_2773

I still need to make it sit more upright…thinking….thinking. But at least it is sitting flat against the table.

IMG_2774

After doing a lot of thinking, I located a small piece foam. It wasn’t ever thick but I thought it was big enough to cut in half. I the first half to the back of the frame and then glued the second half to it. I’m concerned that it won’t be thick enough to make a big enough difference but we’ll give it a try.


I then glue the baskets to the frame. I forgot to take pictures of the whole process…of course. But here is a picture of all them already on. I tried to put enough space between each basket so that I could easily get the rolls of washi tape in and out. I think it looks pretty nice.

IMG_2783

This is what it looks like with all my washi tape in it. I tried to group them by color, starting with the lighter ones on the top row and the black/brown ones in the bottom basket.

IMG_2784

I didn’t get a picture of the angle of the frame but I think it still leans back to far. I need to find something else to glue to the back to make it stand up straighter.

Frowny Face

Thinking…Thinking…Thinking

Update

I found something to add to the back of the frame so it will stand up straighter. It’s a piece of Styrofoam.

IMG_3428

After gluing it to the back, the storage stands up pretty nicely. I’m really loving this now.

IMG_3429

And finally, here’s a picture of the glue gun storage next to the washi storage. I think they look nice together. 🙂 However, I just noticed that the top basket is a little crooked…I’m going to have fix it fairly soon because it will drive me nuts until I do.

IMG_3430

DIY Glue Gun Storage

As I get more into crafting, I have started setting up a small corner of my bedroom as my crafting area. I’ve purchased a whole bunch of things for area, which you’ll see in other posts.

Two things I really need is something to store my glue gun in when it is still warm and something for my washi tape. I decided to tackle the glue gun first.

I looked on Pinterest and YouTube to see what I could DIY. I found one I really liked that used items I could buy from the Dollar Tree. One of the required items was a plastic napkin holder. However, no matter how many times I went looking for it, I could never find the napkin holder. I found all the other items but not the napkin holder. So, I went looking for another idea. I found it on coupontoprovide’s YouTube station. I already had most of the items, the only thing I’d need from the Dollar Tree was a picture frame.

Well, today I finally got around to making the holder.

I pulled together everything I needed:

IMG_2674

  • Picture frames – I show two here. The 5×7 is for the glue gun storage and the 8×10 is for washi tape storage.
    According to couponstoprovide’s directions, I was supposed to use a 3×5 frame but I wanted something a little larger so I could see more of background since that is how it will coordinate washi tape storage.
  • Ruler
  • Needles and thread
  • Silicon pot holder, green
  • Glue gun and glue sticks
  • Craft paper – I pulled a few options. I wanted the background for the glue gun and washi tap storage options to match. I have the green pot holder and blue baskets for the washi tape.

The first thing I did was take apart the picture frame. I set aside the glass because I won’t be using it in this project but I want to save it to use in another project sometime in the future (maybe).

IMG_2678

I used the back piece to measure the background paper. I decided on the multicolored chevron. I used the utility knife so the cuts were very clean.

IMG_2680

I put double-sided tape all over the back of the paper to adhere it to the back of the picture frame.

Now I needed work on the two pockets. First, I needed to cut the silicon potholder in half. I found the middle by using my mat. Then I used my ruler to make sure the cut was straight and made the cut using the utility knife.

IMG_2688

Now, I needed to make each half into a pocket. I started by rolling the first half into a tube and sewing the two sides together.

Then, I sewed the bottom together.

This was actually easier than I thought it would be. I just had to find the right needle and a pretty strong thread. The first needle I picked was nice and heavy but it had a blunt point, which I figured would be difficult to push through the silicone and would definitely not make it through the back of the picture frame. So, I found another one that had a nice sharp point and  heavy enough.

IMG_2690

I finished the second pocket. I placed both pockets on the backing to figure out where to place them. So far I’m liking what I think this will look like.

To sew through the back of the picture frame, I pushed the needle through the front out the back, but I wanted the thread knot to be in the back, so after I made the hole, I withdrew the needle and used the hole to push it through from the back. It was pretty each to push the needle through from the front to back but much harder from back to front, mostly because I couldn’t see where it was going to come out. I ended up making the holes from the front when I needed to come through from the back. After I got the top sewn down, I repeated the process with the bottom of the packet.

IMG_2703

After I repeated the whole thing for the 2nd pocket, I put some hot glue on the back to secure the knots.

IMG_2699

Then I had to put the frame back together. I put the back in the frame and ran a line of glue around the edge to make sure it didn’t fall out.

IMG_2710

Then I put in the cardboard and matting from the front to add bulk for the metal closures. I also ran another bead of glue around the edge of the cardboard piece for even more security and put the piece of matting over that to cover all the messy stuff. And finally, I pushed the little metal brackets back down to hold everything in.

So, what do you think of the final product?

IMG_2715

IMG_2718

I really like it. It holds a nice supply of glue sticks and my glue gun very nicely. The really nice thing is that I can put the glue gun in the pocket while it is still warm since it is silicone. And it any glue drips in it, I can just scope it out once it is cool. And I think it looks really nice on the corner of my desk (close to the outlet).


Thrifting

Valerie and I plan this blog post to be the ongoing documentation of our great finds when we go to thrift stores, garage sales, junk shops, or wherever we can find good deals.

July 29 (Peggy):

My neighbor and I decided to go thrifting. She was looking for something to throw on the couch to keep protect from her very young granddaughter. I wasn’t really looking for anything in particular but thought we might end up at the Dollar Tree, where I did need a few things.

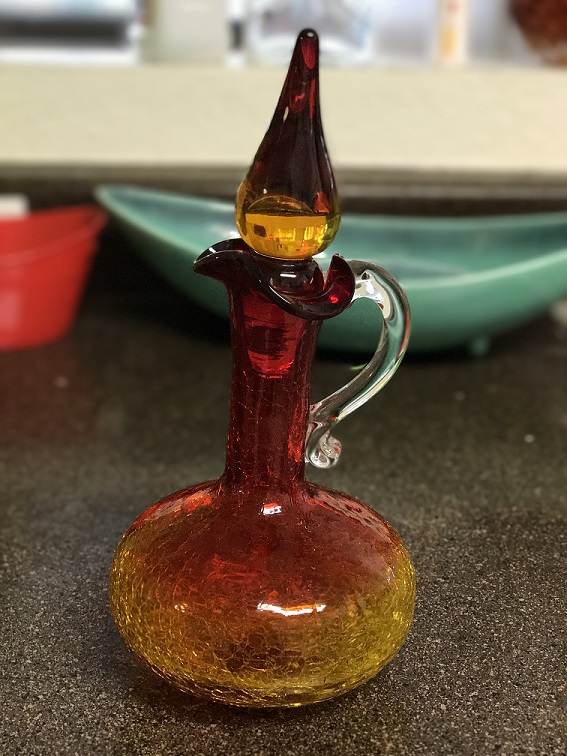
I am sooooo glad I went with her. We hit two different thrift stores. At the first one, everything in the store was 20% off and I had a 10% off coupon too. I found a pair of Ray Rachel EVOO and vinegar cruets. They don’t have the stainless steel pour spouts. At $2.00 piece (before discounts), I figured I could get those on Amazon. I also found a pretty cool wine thingy. Not sure what you call it but you put the wine bottle in it so you can pour in a cool looking thingy. It was $2.00 too. All together, with discounts, l three items only cost $4.20.

Update: To make my Rachel Ray cruets useful, I went on Amazon. I found a set of six pour spouts for only $6.99. I gave them a really good washing and then waited for the pour spouts to arrive. It only took two days and they were here. I put my olive, grape, canola oil blend in the larger cruet and olive oil in the smaller one. I just LOVE them, especially since they ended up costing me on $5.13!

IMG_0447

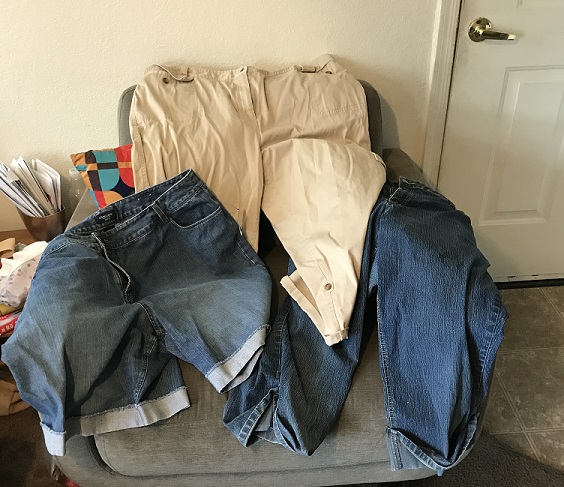
We then went to the Goodwill. The daily color was orange, which means anything with an orange price tag was 50% off.

The clothes are at the front of the store. I always look to see if I can find shorts or Capris my size. I found two pairs of Capri pants and a pair of shorts. One pair of the pants and the shorts had an orange tag. Woo Hoo!!

IMG_0331

We headed back to housewares…and I hit the mother lode. First, I found a Paderno 4-blade spiralizer that looks to be almost new. It has everything in it and two of the blades still have the plastic protective tape on them. It was only $2.99. I looked on their website and found out it goes for $49.99. I got a really great deal. It doesn’t have the manual/recipe booklet but, if I can’t find it, it won’t be that big a deal.


The finally thing I was a really nice Brita pitcher. It also was only $2.99. I’ve been trying to get my neighbor to buy a Brita instead of all the bottled water she buys. She is disabled and has limited SNAP funds. While bottled water is covered by SNAP, my thought is why should she waste that money on bottled water when she just needs a pitcher with a filter. I didn’t let her know it was for her because she wouldn’t have let me buy it. I already have a Brita but it is just the plain one with green reservoir instead of white. This blue pitcher just needs a really good washing and, with the filters I gave her, she’ll be able to try it for a couple of months.

IMG_0332

July 22 (Peggy):i

Mom was here for a visit and the one thing she really loves to do is go antiquing. Our favorite antique store closed recently, so we had to find some new ones. We found a few very close o the house. So Mom, Bronwyn, and I were off for our adventure.

The first place we found was the Antique Village Mall. It was one of those antique stores with multiple stalls. The great thing? They were having a 20% everything at every stall but one. I found a couple of things I really liked but I had to narrow it done to just one. I ended up finding this really cool Royal Haeger. Royal Haeger is a well-known for their MCM pottery, and this one is the perfect color for my living room. Mom and Bronwyn didn’t find anything that they couldn’t live without even though there was much more stuff there that was their style then mine.

IMG_0340

Then we went to a store called Deja Vu Too. It was a much smaller store but she had a lot more MCM stuff for me. Bronwyn found a couple of antique herb cutters (or whatever you call them). Again I found a number of items that I would have loved to buy but I narrowed it down to just one. ;-(

IMG_0338

Our final stopped was at the Antique Resale Market Place. It is partial an antique store and partial resale/commission sales store. The vast majority of the merchandise was southwestern (which is any of our styles). I did find a bedroom suite that I would die to have. It was the whole thing: dresser, chest, night stand, headboard, and 2 mirrors. It was GORGEOUS! I told mom she needed to win the lottery so she could buy it for me. They had each piece priced separately, so we added it up. Overall, it would cost about $2500, which really isn’t bad for an entire bedroom suite…but alas, still out of my price range.

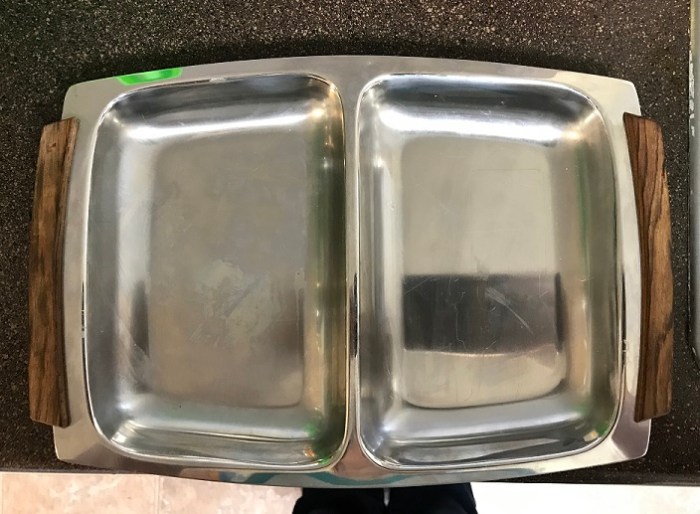
However I dd find a few things I decided to buy, stainless steel serving pieces that match the ones I purchased previously (see below). The divided and rectangle platters were fairly inexpensive. The bowl was only $4 and on sale for 50% off. I do love a good deal!

IMG_0343

IMG_0341

May 21 (Peggy):

Another long stretch between thrifting sessions.

Yesterday, my neighbor and I decided to make a trip to Goodwill. She had a few things she was looking for specifically, and me, I just go looking for deals. And I was lucky enough to find a few things. Update: I use the bottle in my bathroom to hold my mouthwash. It’s perfect and makes the counter look less cluttered.

IMG_8931

I also found a nice Vera Wang top. I checked it over really well to check for stains, rips, and the like. It looked in really good shape, so I snapped it up.

IMG_8939

The best part was that, as we were looking around, they came over the speaker and said that all donated items were 50% off. Talk about being in the right place at the right time! So, I got out of there for less than $8.00.

March 17 (Peggy):

It’s been a while since I’ve been thrifting. I don’t know why its been so long but…

This weekend I had a reason to go. I’m going to be dying some yarn and I needed a pan that I don’t use for cooking food. I don’t have any extra pots that I don’t use for cooking, so I knew I needed to hit the thrift stores to find an inexpensive pot. I went to one Goodwill and found 2 but they were both $13. There was no way I was spending $13 for one pot from Goodwill. So, off to the next thrift store.

And there I found what I was looking for…and more.

The first thing I found was a nice MCM looking lamp. I’ve been looking for a lamp for my bedroom and this one is really nice. The shade, while very cute, just doesn’t go with my current or planned color scheme but it will work until I can decide what I want for the long haul.

IMG_7446

Next, I went to the look for a pot. I found this really nice one for only $7. I snapped it right up. This will be perfect for dying yarn.

IMG_7445

The last thing I found was this cute little round vase. I love the shape and lines on it. Not sure about the color though. It’s sort of a dark peach. I wish it was more orange. It may be something that won’t stay. We’ll have to see.

IMG_7444

Feb. 4 (Peggy):

I went to Goodwill again today. There wasn’t a whole lot but I got a couple of really nice wine glasses. One has opaque dots and the other as a frosted stem. This gives me a total of 6 wine glasses, every single one different than the others. The more I look at the one with the frosted stem, the more I think I may re-donate it but for now, it is in the cabinet.

img_6491

I also found this really nice amber colored bowl. I’m not sure I’m in love with it, or what I’ll do with it but for only $4 (and it was half off that), it was a good buy. If it ends up not really fitting in with my future plans, I’ll just donate it again so that someone else can use it.

img_6490

The final item I found was a square, white plate I found really interesting. Since my dishes are white too, this will work well for serving plate or luncheon plate. Not sure, but I like it.

img_6495

Jan. 21 (Peggy):

I love going to thrift and antique stores. I love looking for the hidden gem that is just exactly what I’m looking for…and sometimes what I’m not looking for. What I like is more likely to be in my price range when I’m at a thrift store then an antique store, especially since I am very much into mid-century modern.

Yesterday I went thrifting with my new neighbor. I was looking for, of course, items that would fit into my mid-century modern theme.

The first items I found weren’t on my list but they were items that I just had to have: a beautiful 13 ½ inch cast iron skillet and an almost new bread machine.

The skillet had very little rust on it and it didn’t take much to me to get it all off when I got home. A short soak in super how water, a good scrubbing with a copper pad, and some additional scrubbing with salt and a sponge and it was ready to be seasoned. A little oil and an hour in the over and it was ready! Update: The first thing I cooked in the pan was a rib-eye steak. The only other pans I have are non-stick, so the cast iron skillet let me get a really great sear on the outside before finishing it off in the oven. 

cast-iron-skillet

The bread machine was in really good shape, like I said it looked like it was almost brand new. It didn’t have the owner’s manual/recipe book, but I figured I could download it once I got home. The bread pan was a little dirty but a quick soak and scrub and it was good to go. I’m really looking forward to making my own bread. Update: A few days later, my neighbor found the exact same bread machine at a Goodwill store on the other side of town. Her’s came with the manual/recipe book. So, I didn’t have to download the book, I just copied hers. I picked out a couple of bread recipes I wanted to make and went to the grocery store to get the ingredients. I mean, I don’t even have flour in my pantry. The first load I made was Country French bread. It was delicious! 

bread-machine

The next item I found was an interesting wine glass. I have a collection of wine glasses with no two being the same. I mean, I really don’t have any pairs of matching wine glasses let alone an entire matching set. It certainly makes it easy to recognize your glass during a party. This one has an almost bronzy color on the outside. It was the only one and I snapped it up. There were three matching champagne glasses but I wasn’t interested in them. I just don’t drink a lot of champagne.

The other items I found were things that would be perfect in my new décor. I found two platters that look like they came directly from the 50’s and 60’s, an atomic looking fruit bowl (which I may end up changing the color and hanging on the wall), a very inexpensive vase that’s plastic but I love the shape, and a kitschy ceramic butterfly candy dish (which also may end up on the wall). Update: I ended up painting the vase copper and I really like it better now. 

montauge-1

stainless-platters

Update: I found a few more pieces of this stainless steel serving dishes (see above).

butterfly-dish

Update: This is now hanging on my wall. Love it! You can see a picture in Personalizing My Picture Frames

I am so looking forward to my next trip!