New Christmas Tree Skirt

I’m slowly redoing my home with mid-century modern furniture and accessories. So far, the living room and dining room are looking pretty good. I still need more accessories but I can do that slowly so I can get the pieces I really want.

As part of the make-over, I decided I needed to think about changing up my Christmas decorations too. The first thing I thought about was my Christmas tree. After all, the tree is the show piece of everyone’s Christmas decorations.

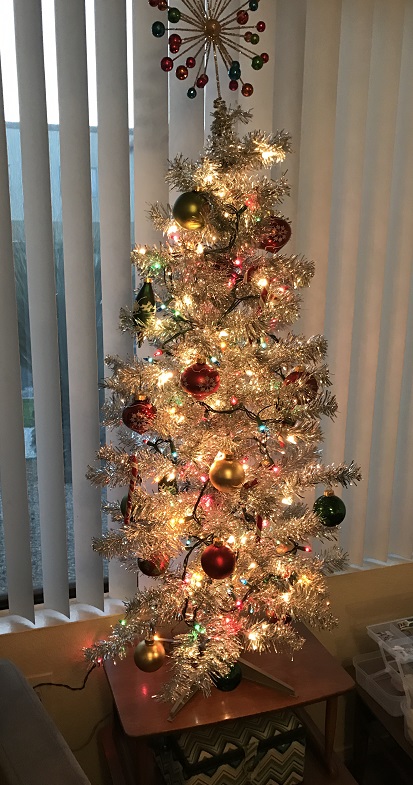
My first purchase? A silver tinsel tree. That was the iconic tree of the time period. There was no way I could afford a real antique one — mid-century modern is so freaking expensive. I started looking online for a reproduction. Ugh! The ones that look most like the originals are still too way expensive too, even a smaller one that would fit nicely in my apartment. I’m going to have to save up for one of those.

What I did find was an inexpensive one on Amazon, it is no longer available so I can’t provide a link. I also started looking for a tree topper. I knew I wanted one of the atomic looking ones. Again, the real thing was out of my price range. However, I was luckier finding a really great reproduction. I found a great 11 ½ inch starburst on Amazon. I was worried that it wouldn’t look as good as I hoped. However, it is perfect.

Then I got out the ornaments I used last year. While not being particularly MCM, I found they looked just fine. I’ll eventually get new ones but these will work this year.

IMG_5471

Finally, the only thing missing was a great tree shirt. I couldn’t find any originals, within or outside my price range. I looked for reproductions but the few I could find still were not within my price range. So I decided to make my own. I started looking for mid-century modern fabric to use. While there is quite a bit of MCM fabric out there, the amount of Christmas fabric is limited. I couldn’t find anything I liked. The piece that kept coming up in all my searches was this piece with birds sitting on a limb with an orange background. I mean, really, orange? For Christmas? I love orange. I love mid-century modern. But I do not love mid-century modern orange Christmas fabric!

So, after doing more research, I decided I would make one out of felt. I knew I was going to be really busy at work, so I went to my old standby (and favorite) retailer, Amazon. I purchased the following materials:

My idea was to make the skirt itself from the red felt and then use the multi-colored swatches to make cutouts of mid-century modern ornaments to place around the skirt. I figured it would take me “no time at all” to have the tree skirt finished and under the tree. Oh boy, was I wrong. Cutting out the skirt turned out to the easiest part of this little endeavor.

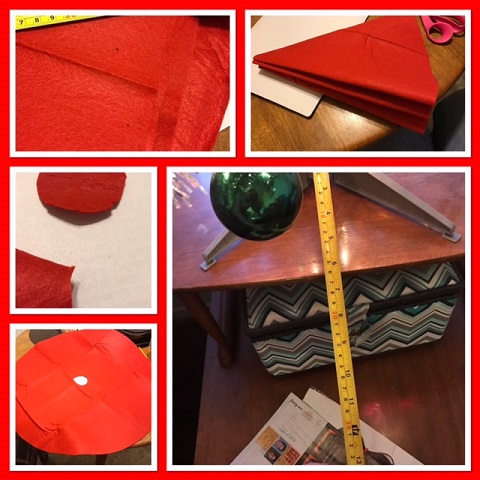
First, I measured how far far I wanted the tree skirt to hang. I decided on 12 inches. Then I cut a piece of the red felt that would be large enough for the size I wanted. I folded it in half, half again, and then again until I had a nice little triangle that would make it easy to cut a circle. Using the tape measure, I measured out 12 inches along the edge. I cut along that edge to make the circle. I then cut off the tip of the triangle to make the hole for the tree trunk. I unfolded the circle and trimmed any unevenness in the outer circle so it was nice and round. Finally, I cut from the outer edge to the middle to make the opening so I could put it around the tree. That took all of about 30 minutes.

collage

IMG_5482

Then I started working on the ornaments. I did a lot of researched, looking for what ornaments looked like during that time period. Then I tried to cut them out and decorating them freehand…with mixed results. A few turned out okay, the rest looked like total crap. I was really disappointed. So much for thinking it was going to be easy.

IMG_5748

So, I started looking for printable ornament patterns. I found a number I really liked and went to print them out.

Aannnddd, my printer decided it wasn’t going to recognize the color ink cartridge. I couldn’t print them out even though I had it set for black only. UGH!!!!!! With Christmas being so close, I really wanted to finish the tree skirt.

So I resigned myself to going to Just using it plain and working on it again after Christmas.

In the meantime, I was also collecting a few other MCM Christmas decorations. I found a couple of felt stockings on Amazon that were kind of cute. When I got them, I thought they were cute, not great, but would be good enough for now. But then I went to Lowe’s, I found some I really wanted. So, I snapped up two at 50% off along with a matching door mat.

IMG_5743

I was going to just throw the two felt ones away (I’d only bad $2-3 for them) since the loop was already looking like crap because I used tape to hold them to the front of my TV credenza. But the more I looked at them, the more I thought that I could use the figurines (Santa and a reindeer) on the front for my tree skirt.

I cut out the reindeer, Santa, the candy cane, and the Ho! Ho! Ho!.

IMG_5744

I placed those around the tree skirt, as well as the few ornaments I thought were decent.

IMG_5746

After gluing everything down. I placed it back under the tree. It looks fairly nice and, overall, I like it.

Is it want I want forever? Definitely not. But it’s cute enough that I now have the time to find the PERFECT tree skirt.

IMG_5749

Peanut Butter – Take 2

As I’ve said before, I really love peanut butter. However, I decided to stop buying process peanut butter (goodbye Skippy) that contained way too much sugar and salt. Well, actually my daughter made that decision for me.

My first attempt at making peanut butter turned out pretty good. The flavor was excellent but the texture wasn’t what I was looking for. When I add the last ¼ cup of peanuts to make it chunky, it added chunks as well as peanut dust. So, it was grainy. Now, I don’t know if you’ve very had grainy peanut butter but it leaves a whole lot to be desired. I mean, I ate it but it was a little like eating really good tasting mud pie or sand from the sandbox.

I decided that it was time to try again and see if I could make some really great tasting, super-duper, chunky peanut butter. I also decided I would do a much better job timing how long it took to get the smooth consistency I wanted and taking pictures as I went along.

Again, I was totally surprised by how loud it was. It is really, really loud! Cian made his objections heard over the food processor. Lord have mercy!! I am really going to have to get ear plugs or something.

As you can see, it goes through a number of stages. I missed the photo of when it turned into a little dough ball. I didn’t remember it doing that the first time and just thought, “Crap! I’ve screwed it up. What did I do wrong?” But I figured I had nothing to lose by letting it run a little longer and, wa-lah, it loosened up again and started to look like peanut butter again, instead of a hot mess.

pb06 1 minute

pb09 2 1/2 minutes

pb12 Approximately 4 minutes

pb14 5 minutes

Then to get super chunky peanut but without the grainy texture, I decided to remove the smooth peanut butter from the food processor before making the chunks. I thought I would have to put the peanut chunks through a sieve to get rid of the dust. But I didn’t have to.

As you can see, all of the dust stuck to the residue left in the bowl. This left me with some nice chunks to add to my smooth mixture. To be on the safe side, I still poured them into the sieve. I really DID NOT want to have grainy peanut butter again.

pb16 The super-duper chunks.

pb18 Adding the chunks.

I thought I was all done. I took a little taste and it became very clear I had forgotten something. I quickly stirred in a scant ¼ teaspoon of my super fine pink Himalayan salt and a scant ¼ teaspoon of stevia.

I now have great tasting super chunky peanut butter with the perfect texture! I’ve added the updated recipe below.

pb20

I was already to make myself a PB&J (organic red raspberry preserves) and discovered I was out of bread. No peanut butter sandwich for me. I am greatly disappointed. I am going to have to postpone my pleasure until later.

Super Duper Homemade Chunky Peanut Butter

Ingredients

  • 1 ¼ cup unsalted, roasted peanuts, separated
  • ¼ tsp finely ground salt, or to taste (I used pink Himalayan salt)
  • ¼ tsp stevia, or to taste

Directions

  1. Place 1 cup of peanuts in bowl of food processor.
  2. Grind peanuts until smooth. This could take approximately 5 minutes, so be patient.
  3. Add salt & stevia and pulse to combine.
  4. Remove peanut butter from food processor bowl.
  5. Add remaining ¼ cup of peanuts to food processor.
  6. Pulse until you receive the desired chunk size.
  7. Place peanut chunks in fine mesh sieve to separate peanut dust from chunks.
  8. Add chunks to smooth peanut butter and stir to combine.


I Love Peanut Butter

I love peanut butter. I mean, really love it! And it has to be the extra chunky version.

I used to buy the package of two Skippy Extra Chunky at Costco every couple of months. And I’m the only one eating it! I almost consider that an addiction.

However, late last year I had a little run in with skin cancer. My daughter, who is very much into healthy eating and healthy living, decided that I needed to remove as many chemicals from my house and my food as possible. Unfortunately for my peanut butter addiction, she considers refined sugar to be one of those chemicals I needed to remove from my diet. (Depression ensues…)

There aren’t any grocery stores really close to me with a nut grinder so I can grind my own peanut butter. And the all-natural, organic, sugarless brands are just too expense for my budget.

I finally broke down and decided to try to make my own peanut butter. I read a lot of recipes and blog posts to see exactly what I could expect. It didn’t seem that hard. I mean, I have a decent food processor. I should be able to do this, right? And the answer is, Yes. This is a big step for me since I’ve always been the ‘buy frozen pierogis’ type of cook.

While my daughter and I were at Costco (the reason I couldn’t just buy the Skippy and not tell her), I decided I’d buy the peanuts there but they didn’t have any that weren’t already salted (and salt is also now on my banned list). So, I went to my second favorite retailer, Amazon. I found a 5-pound bad of unsalted peanuts. And with Prime, I received them in just two days.

pb01


I put one cup of peanuts in the food processor bowl and turned the thing on. Man, it was loud. I mean, really, ‘I need ear protectors’ loud. Cian, my 18 month Pembroke Welsh corgi, had a fit. His barking just added to the noise level.

I should have taken more pictures, but I didn’t think about it until after I was done, of the entire process. I’ll do it next time.

After about a minute, I just had a bunch of chunks. At two minutes, I had chunks and peanut dust. It seemed to stay that way for a few minutes. I started to get worried that it would never turn into peanut butter.

But all of sudden, I noticed that it started to get stripes of a darker brown. The stripes got wider and wider…and then it happened! It turned into peanut butter!

The first time I checked it, it was really just too grainy. I decided to turn it back on. I mean, what did I have to lose? There was no way I was eating that grainy stuff.

In another minute or two, I checked it again, and it was really smooth. But as I said, I love the extra chunky peanut butter. I decided to add another quarter cup of peanuts and pulse them to get a few chunks. That didn’t work out very well. I not only got chunks but the dreaded grainy dust.

After tasting it, I added just a dash or two of pink sea salt and a quarter teaspoon of stevia as a sweetener.

This batch tastes pretty darn good. However, I think the next time I make peanut butter, I’ll made the chunks separately, shift out the dust, and then stir them into the smooth.

Stay tuned and I’ll let you know how that turns out.

pb04

Homemade Peanut Butter

Ingredients

  • 1 ¼ cup unsalted, roasted peanuts, separated
  • 2 dashes Sea salt, or to taste
  • ¼ tsp stevia, or to taste


Directions

  1. Place 1 cup of peanuts in bowl of food processor.
  2. Grind peanuts until smooth. This could take a few minutes, so be patient.
  3. Remove peanut butter from food processor bowl.
  4. Add remaining ¼ cup of peanuts to food processor.
  5. Pulse until you receive the desired chunk size.
  6. Place peanut chunks in fine mesh sieve to separate peanut dust from chunks.
  7. Add chunks to smooth peanut butter and stir to combine.